Application Setup
This guide explains how to configure an automatic user provisioning app for your Bloomflow platform from Microsoft Entra ID (Azure AD) app using the SCIM protocol. When configured, you will be able to automatically provision and deprovision users to Bloomflow.
SCIM is an open standard for automating the exchange of user identity information between identity domains. It simplifies user provisioning and management by enabling seamless synchronization between a service provider (like Bloomflow) and a client identity provider (like Microsoft Entra ID).
Capabilities supported
- Automatically create users in Bloomflow.
- Automatically suspend users in Bloomflow when the Microsoft Entra ID (Azure AD) profile is suspended.
- Keep user attributes synchronized between Microsoft Entra ID (Azure AD) and Bloomflow.
Prerequisites
Before starting, ensure you have the following:
- A Microsoft Entra ID (Azure AD) tenant
- A Bloomflow Provisioning API key
- Your bloomflow API URL. (Find this in the Bloomflow Admin > Platform Info)
- Administrator access to Microsoft Entra ID (Azure AD) for configuration
- A user account in Bloomflow with Platform administrator permissions
To get a Bloomflow Provisioning API key, please contact our support team at support@bloomflow.com.
Step 1: Add a Bloomflow application to Microsoft Entra ID (Azure AD)
You can skip this step if this is already the case
-
Log in to the Microsoft Entra ID (Azure AD) Portal: Microsoft Entra ID Portal
-
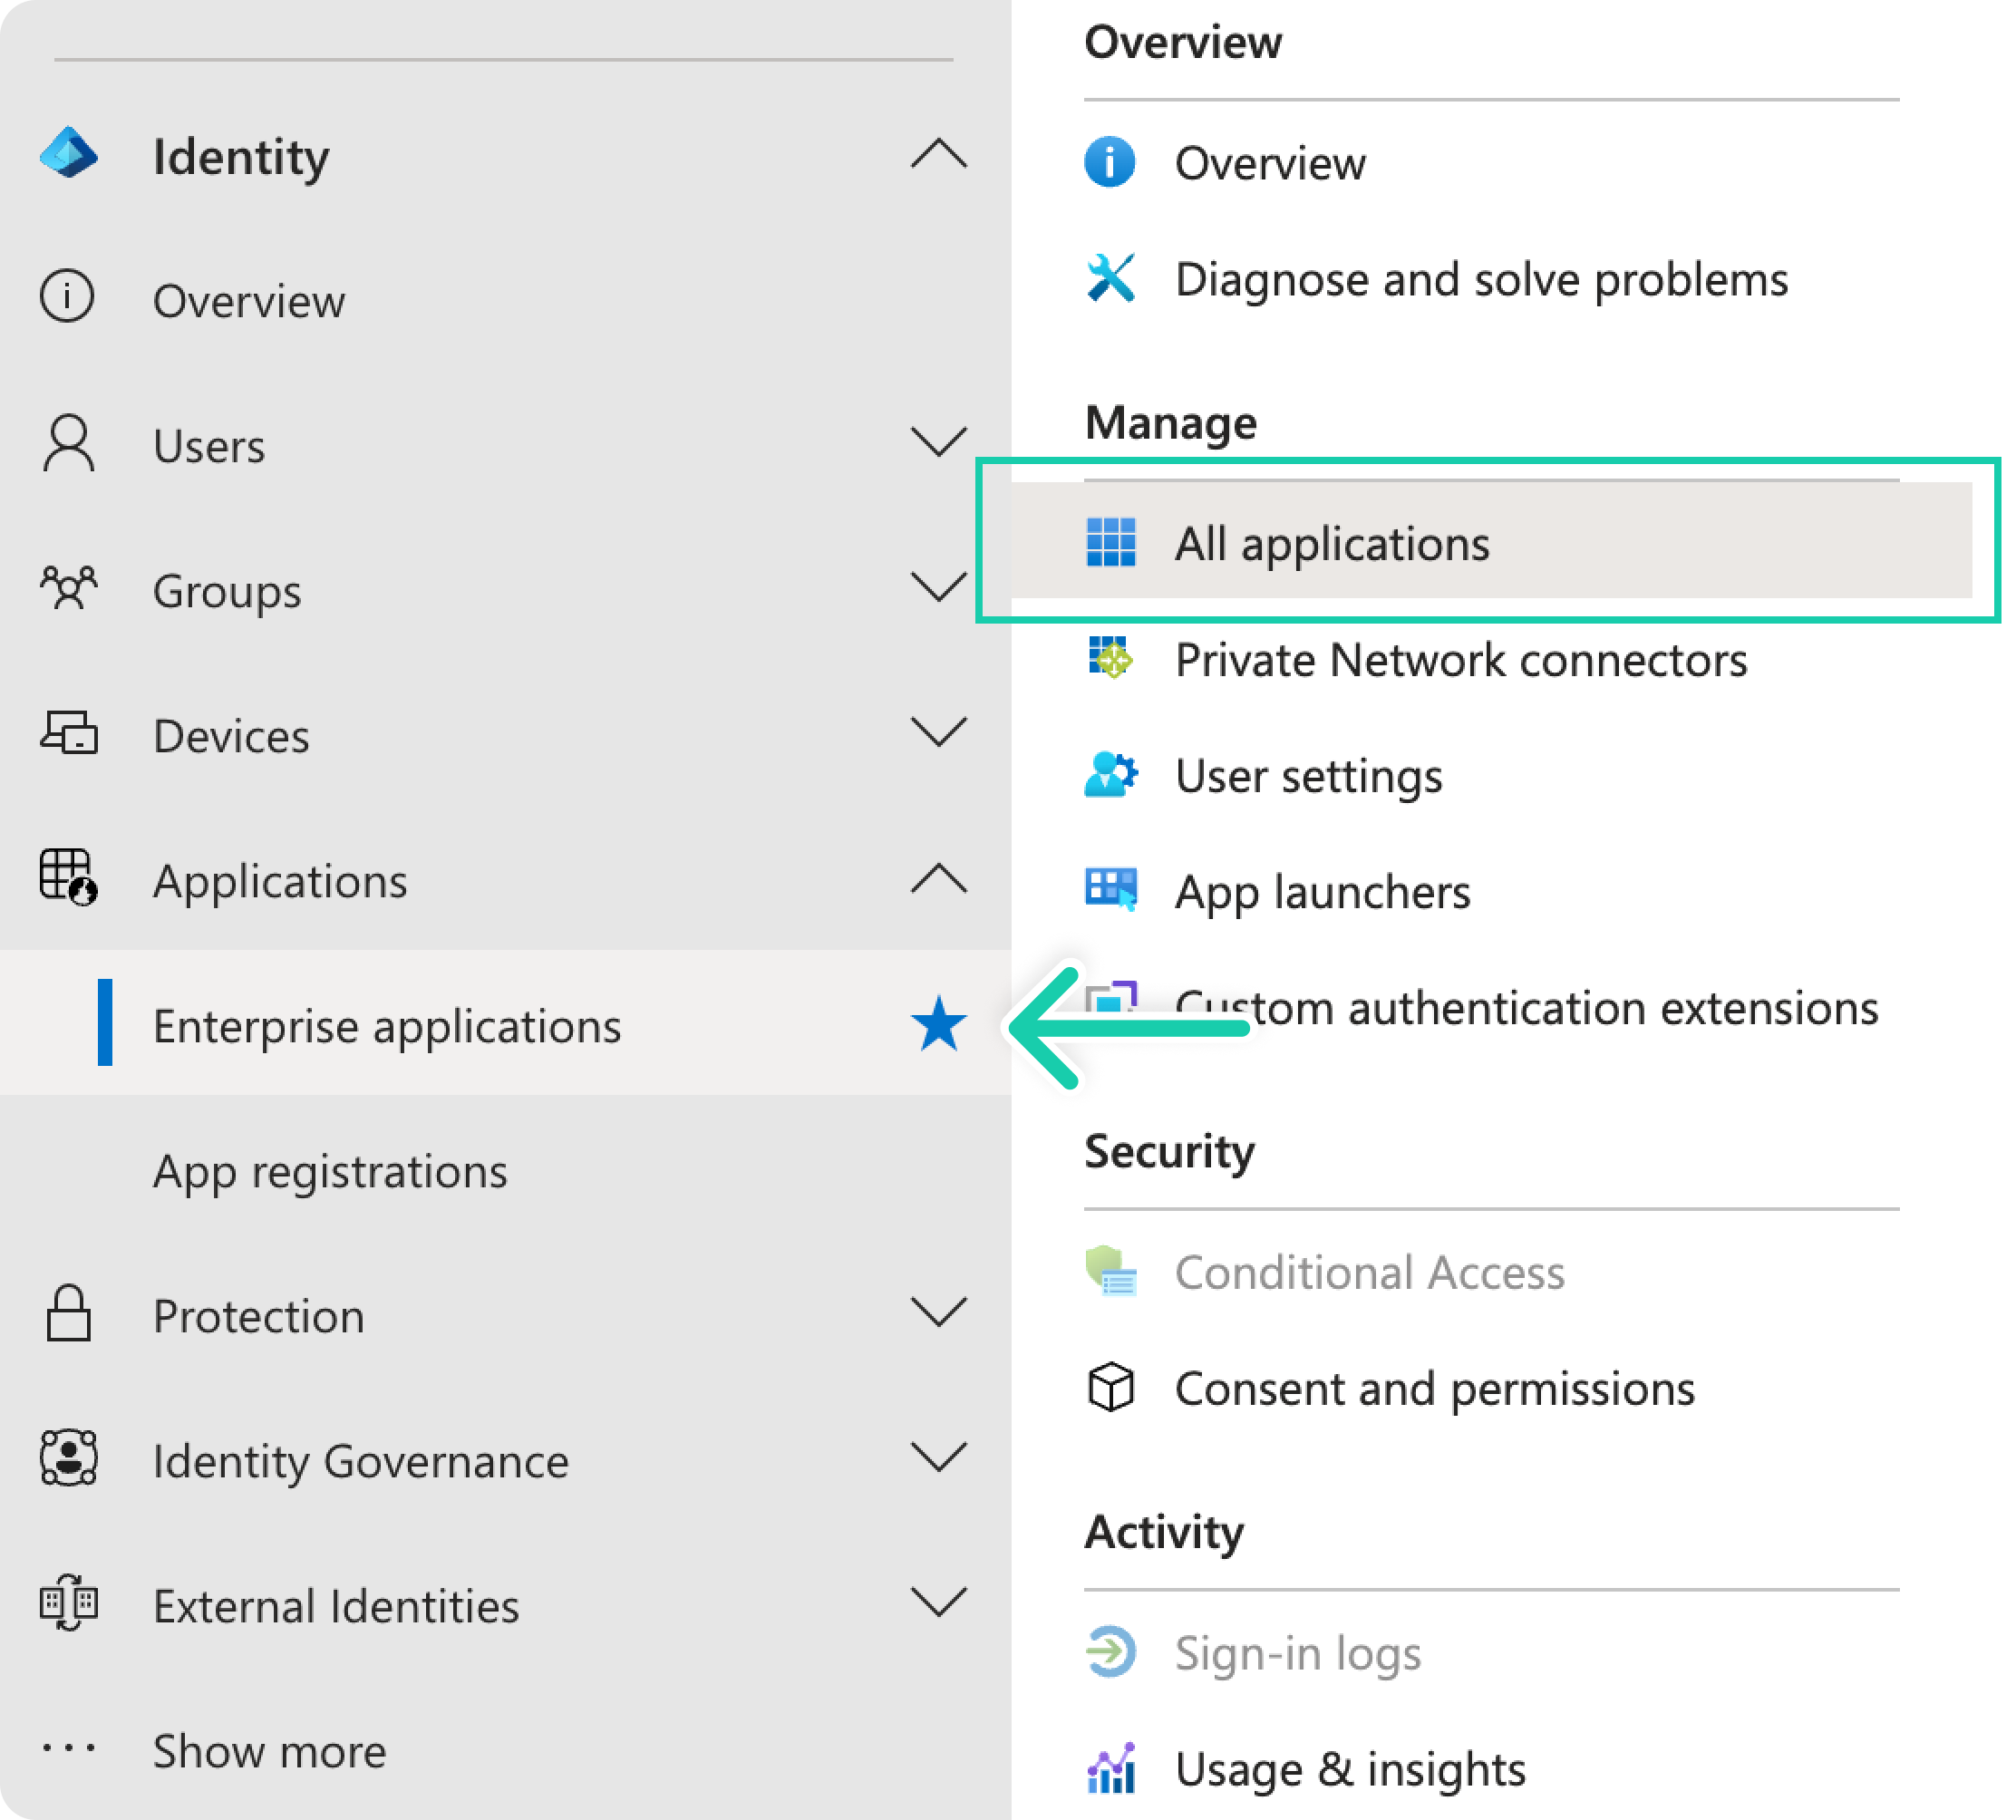
Navigate to Enterprise Applications: Expand the "Identity" menu on the left-hand side panel.
- Expand the "Applications" menu.
- Navigate to "Enterprise Applications"
-
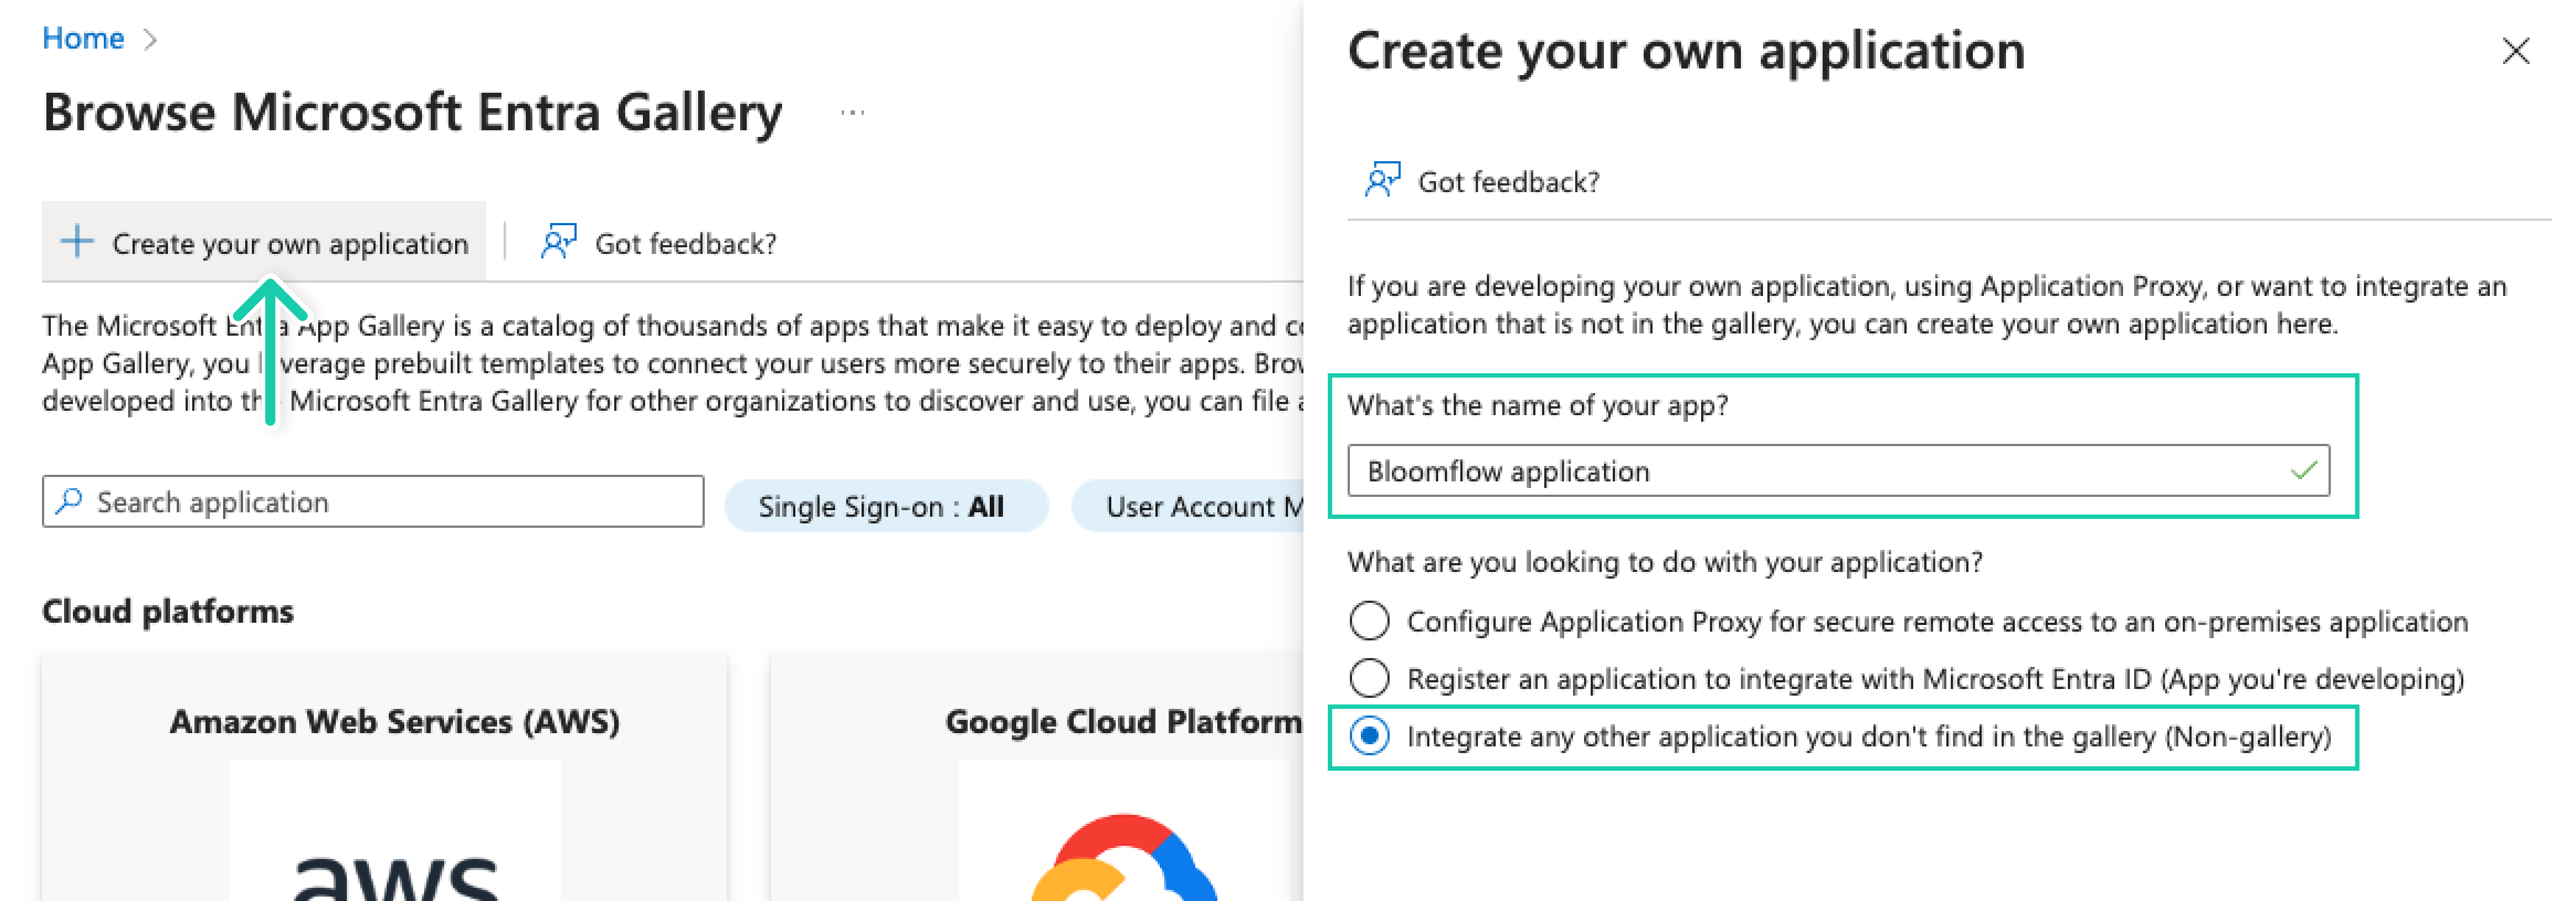
Add a new application: Click "New application", then “Create your own application”
- Enter a name for the application (e.g., "Bloomflow Application").
- Select "Integrate any other application you don't find in the gallery (Non-gallery)"
- Click "Create."
Step 2: Configure automatic user provisioning for Bloomflow
This section guides you through the steps to configure the Microsoft Entra ID (Azure AD) provisioning service to create, update, and disable users in Bloomflow based on user assignments in Microsoft Entra ID (Azure AD).
To configure automatic user provisioning for Bloomflow in Microsoft Entra ID (Azure AD)
-
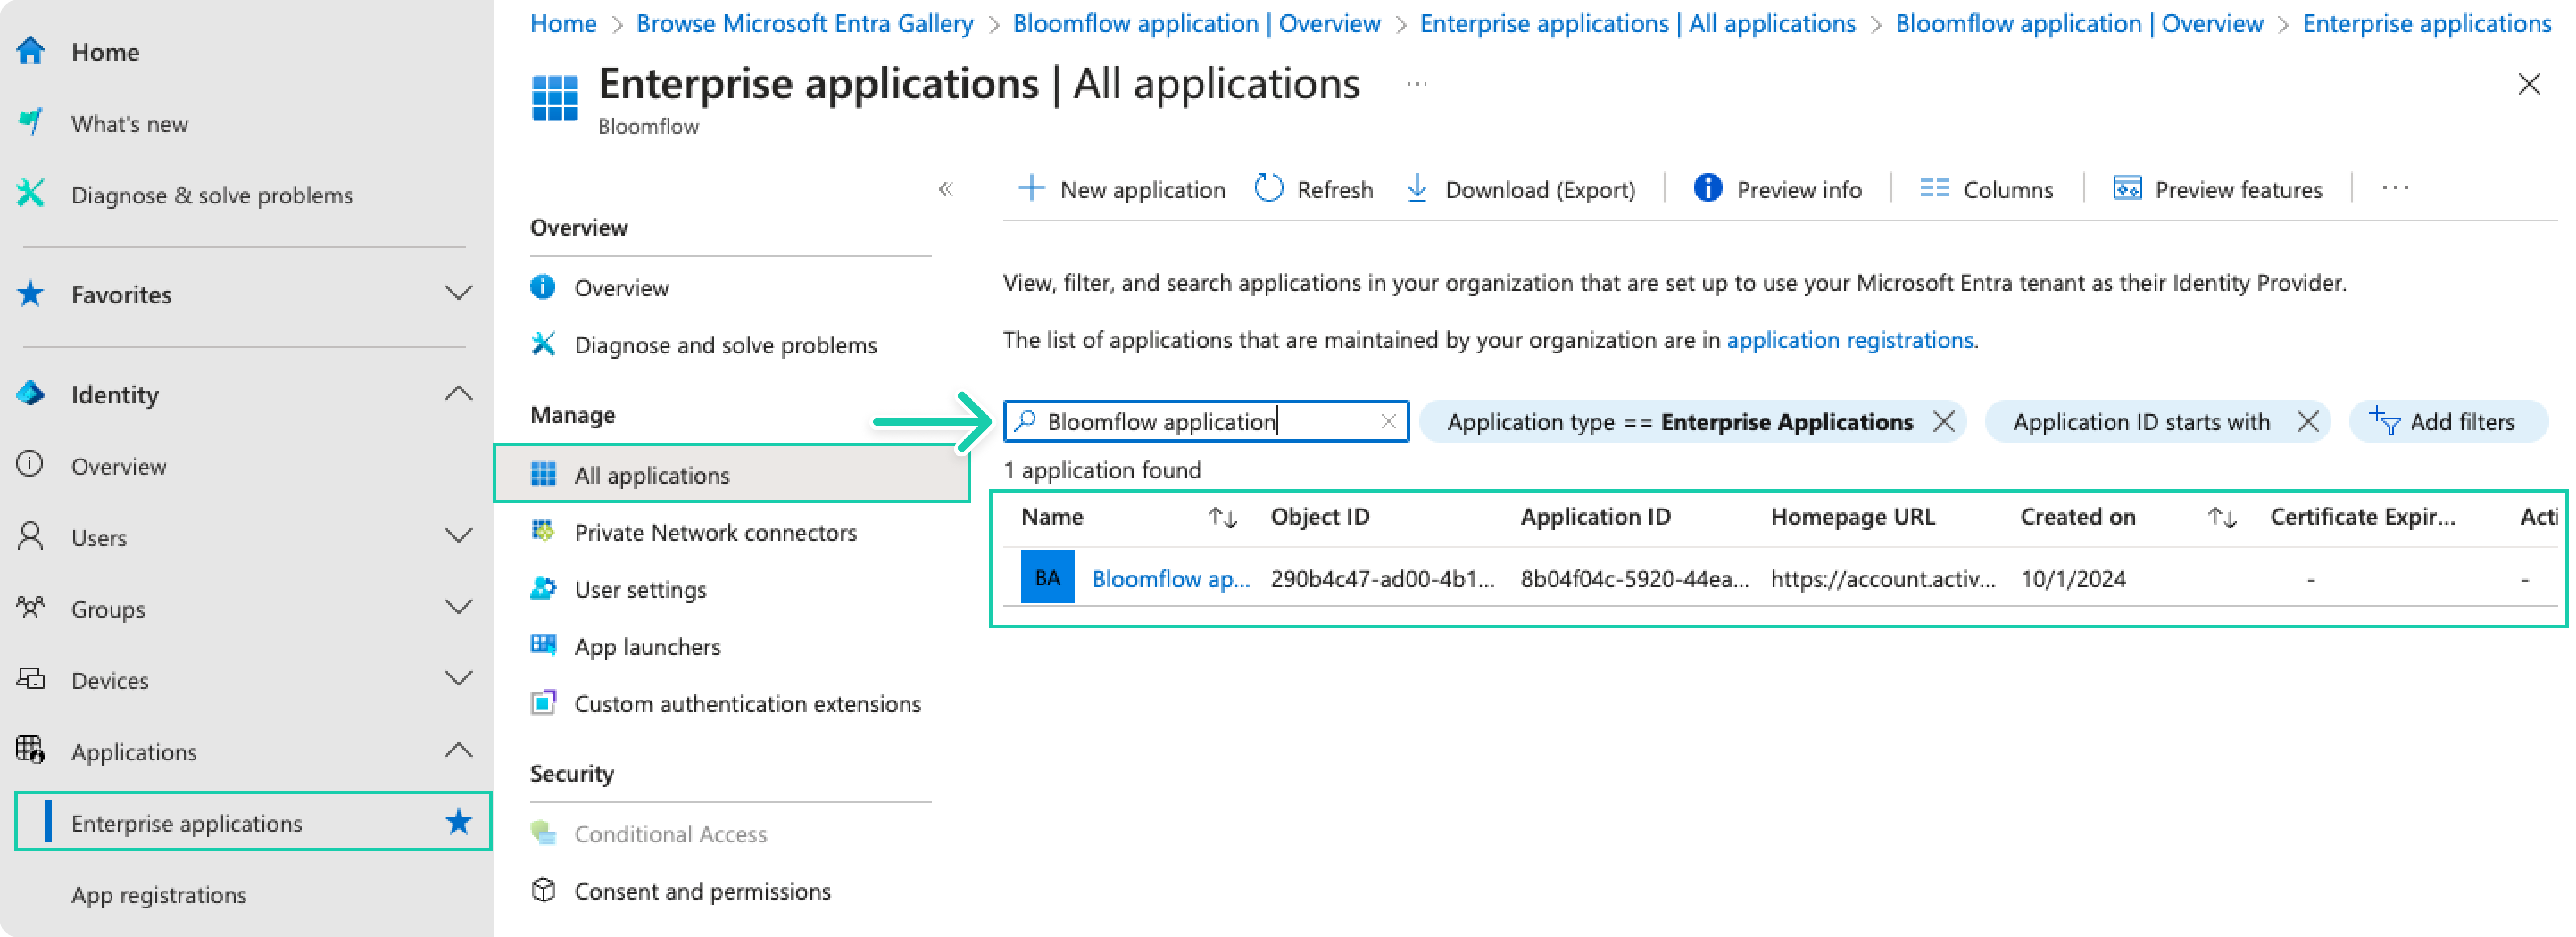
Browse to Identity > Applications > Enterprise applications and in the applications list, select your Bloomflow application.
-
Select the Provisioning tab.

-
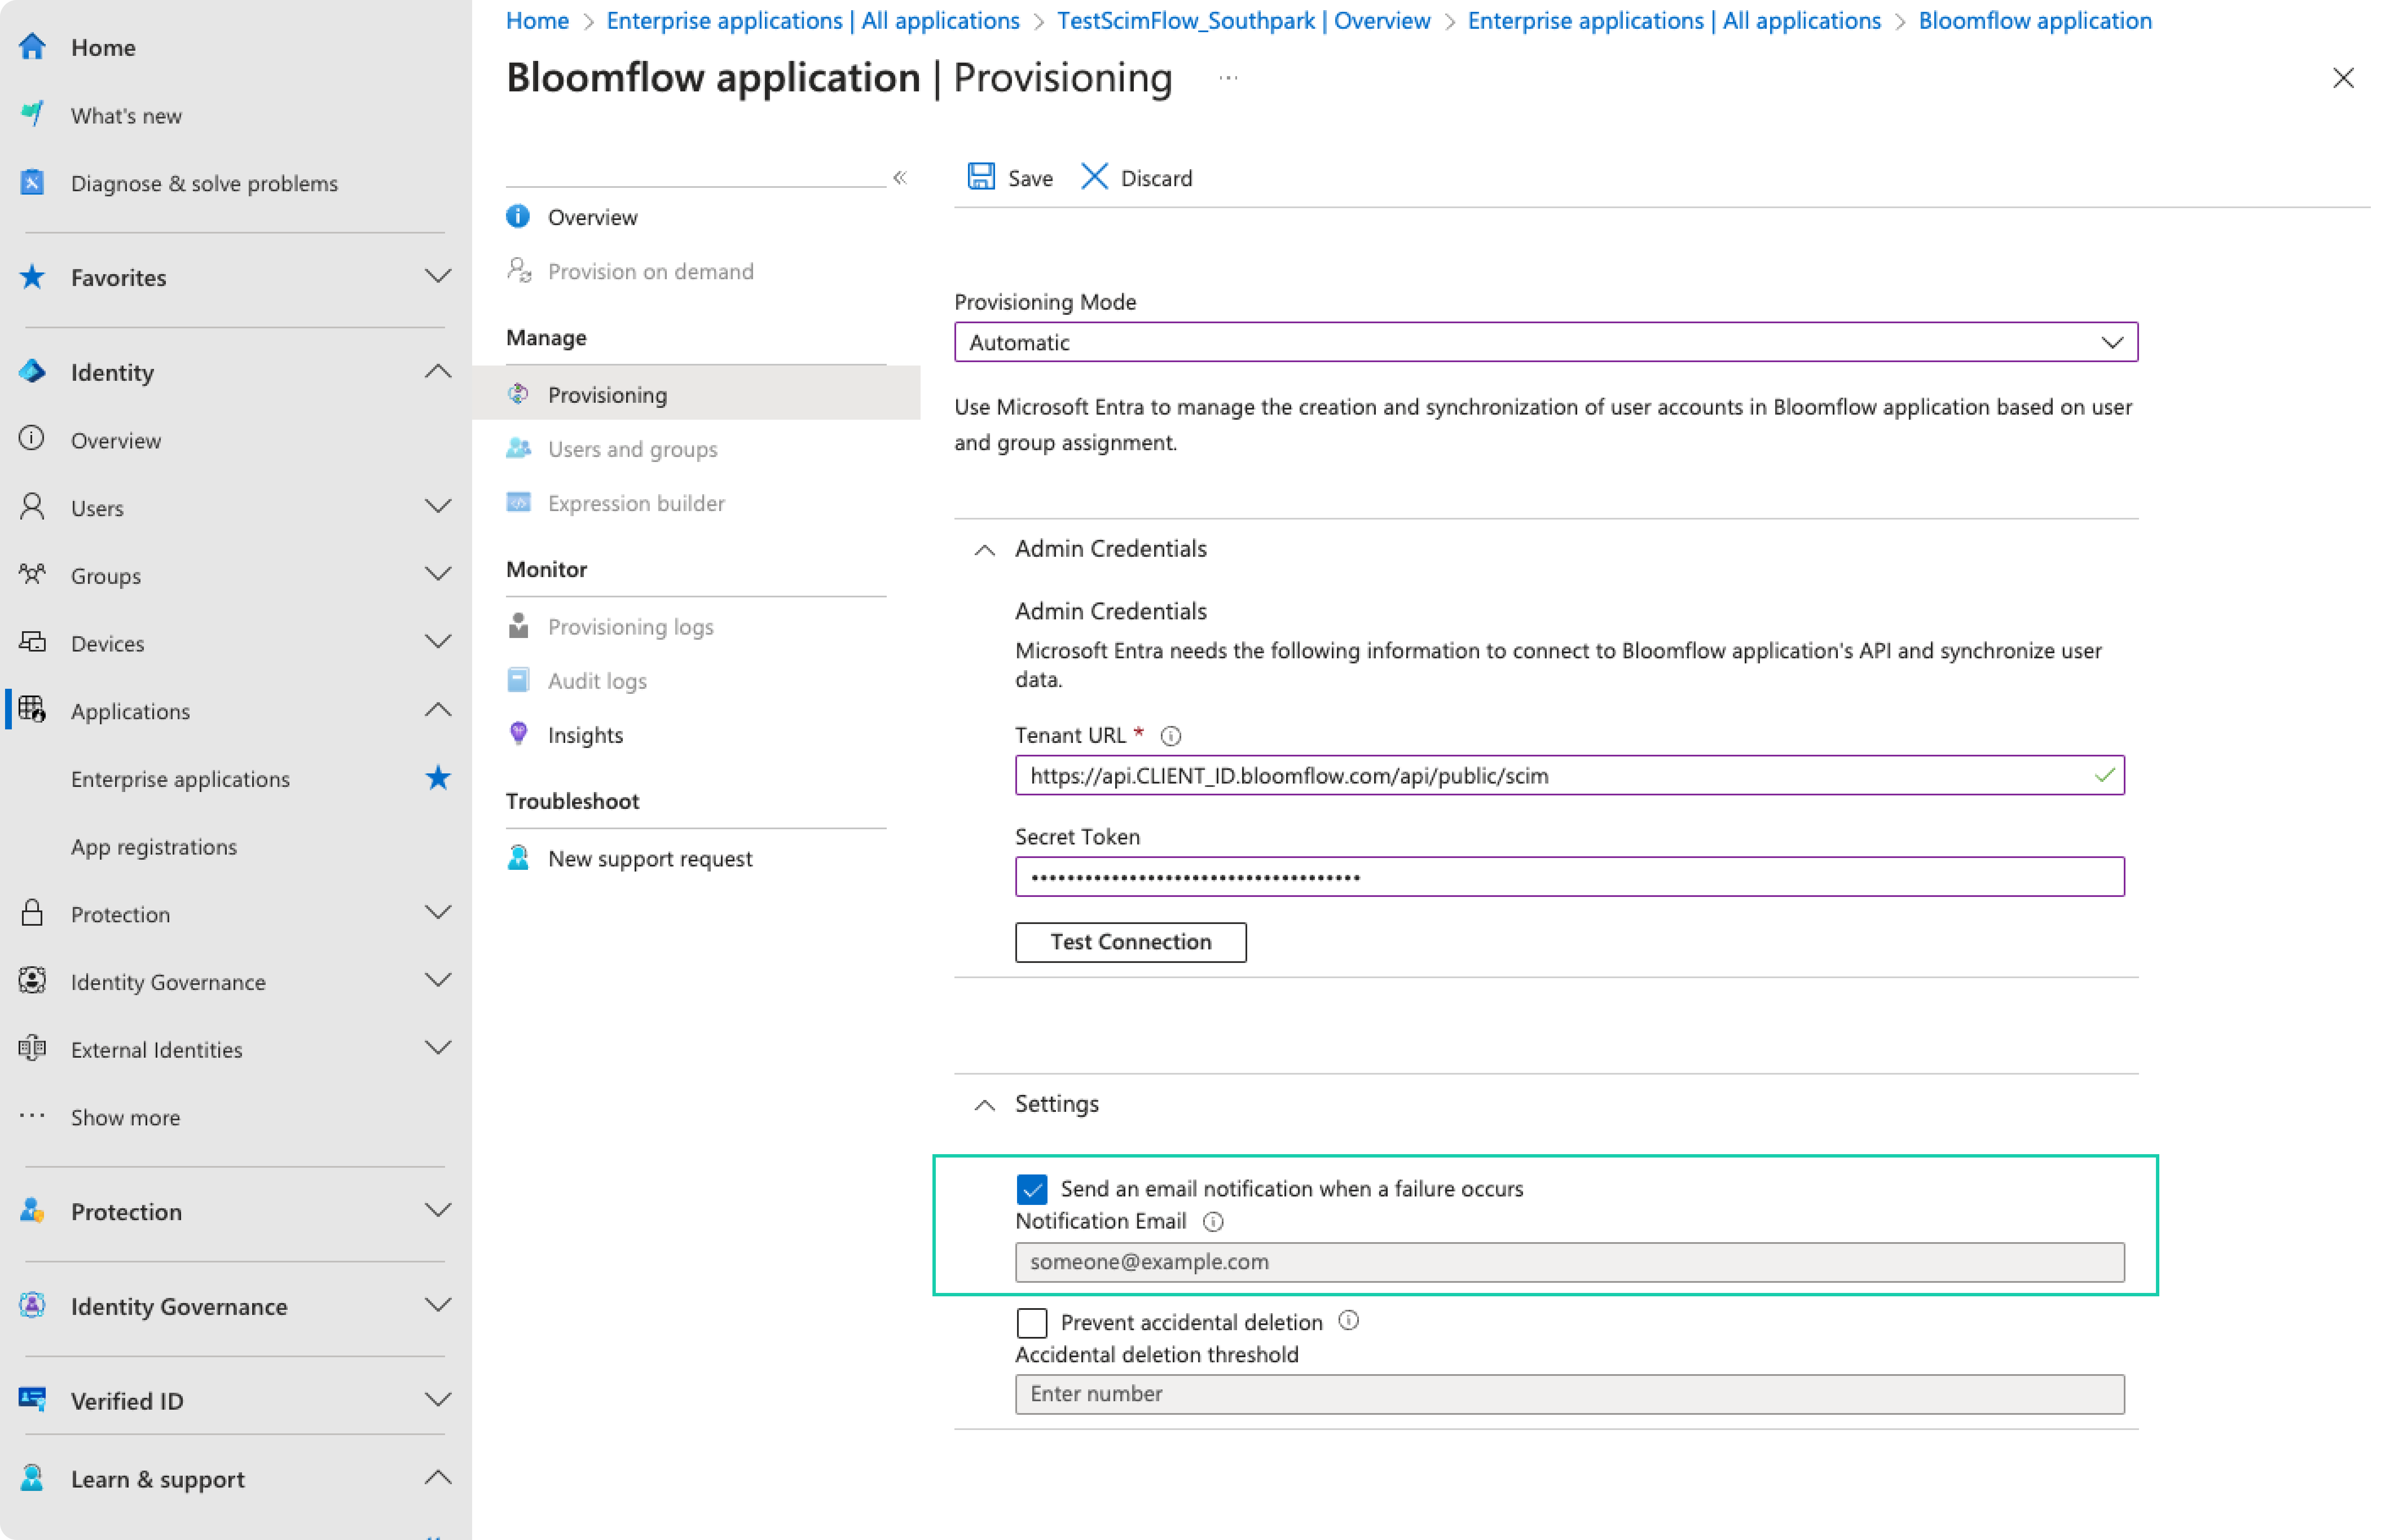
Set the Provisioning Mode to Automatic.
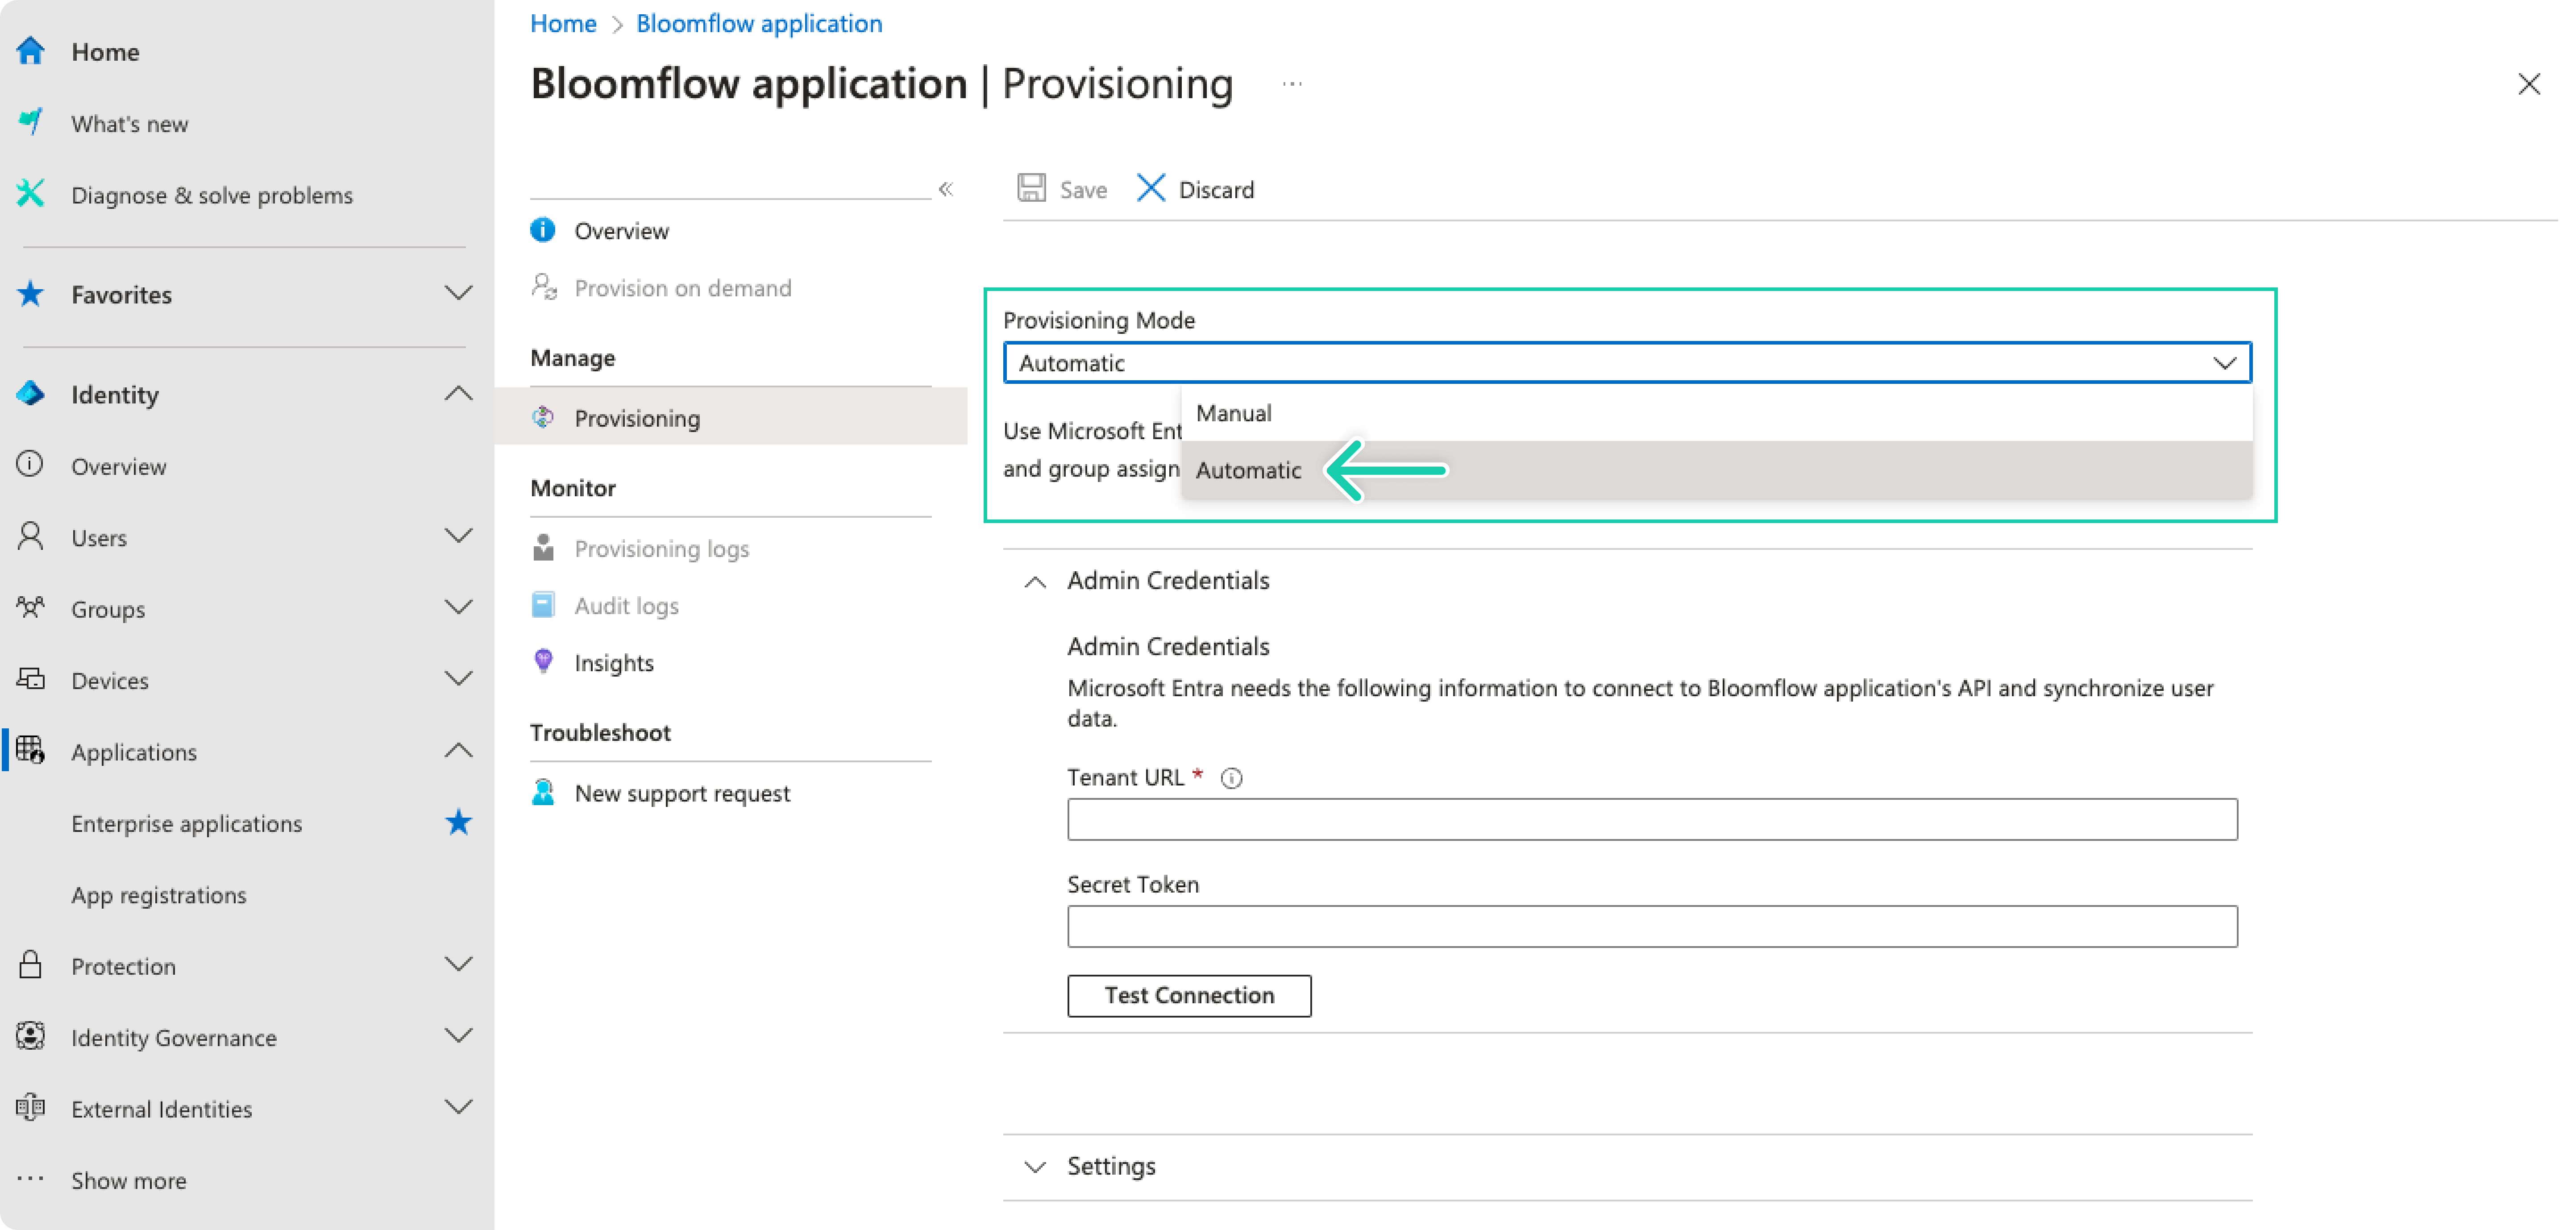
-
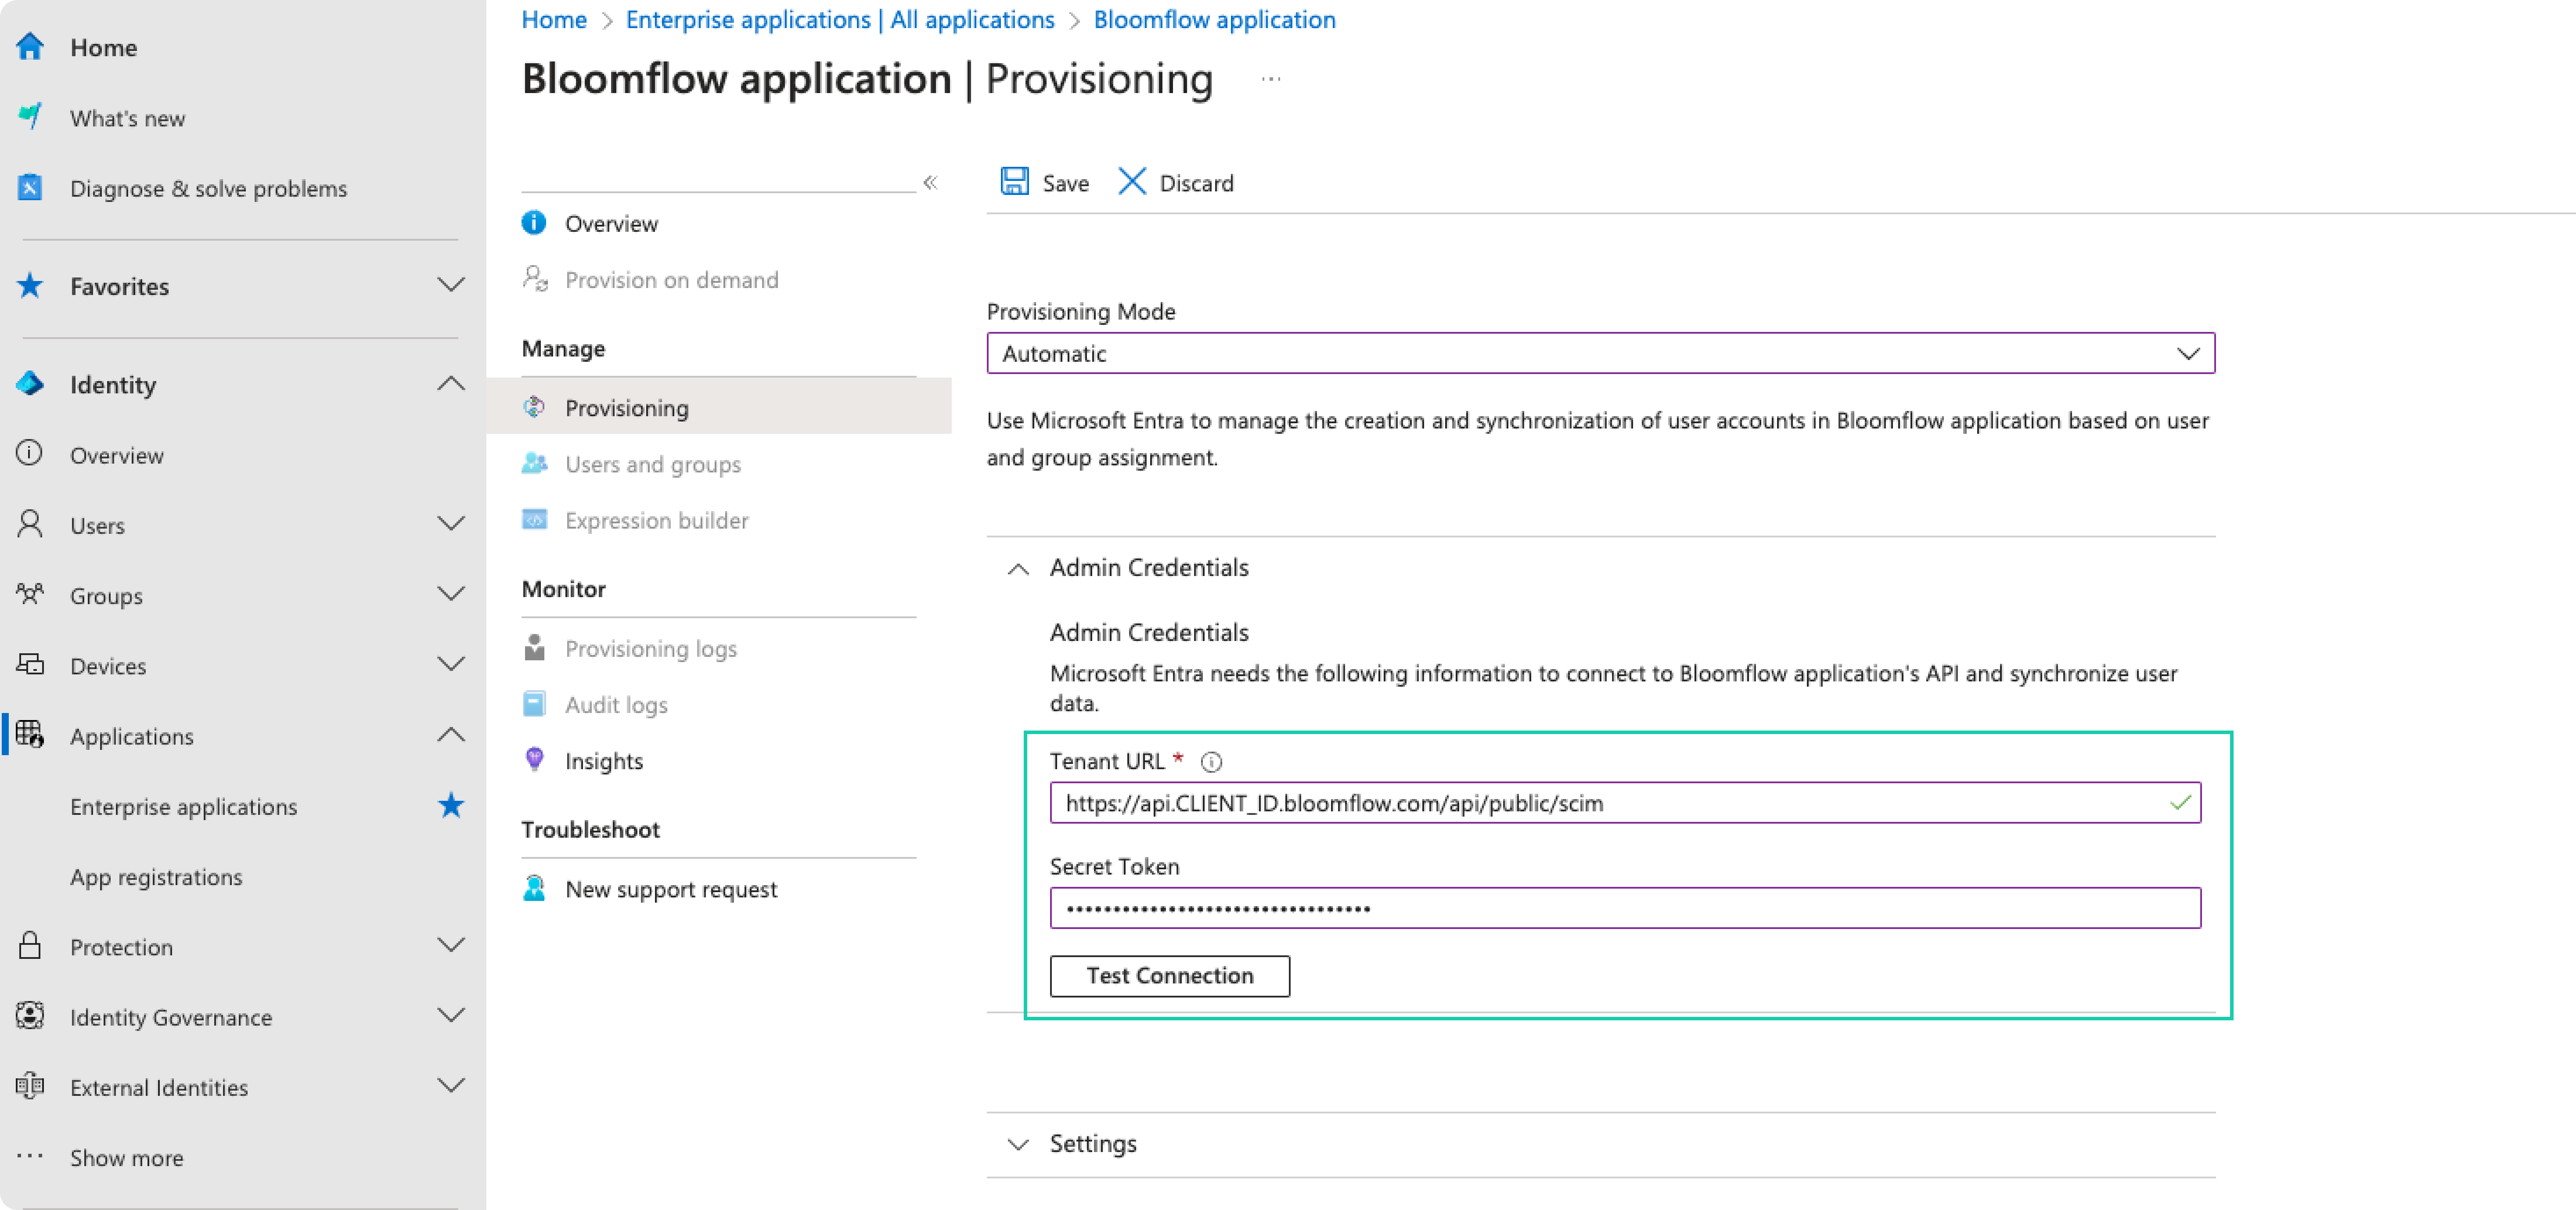
In the Admin Credentials section, input your Bloomflow Tenant URL and your Bloomflow provisioning API Key provided by Bloomflow. Click Test Connection to ensure Microsoft Entra ID (Azure AD) can connect to Bloomflow. If the connection fails, contact Bloomflow to check your account setup.
 tip
tipYour bloomflow API URL. (Find your CLIENT_ID in the Bloomflow Admin > Platform Infos)
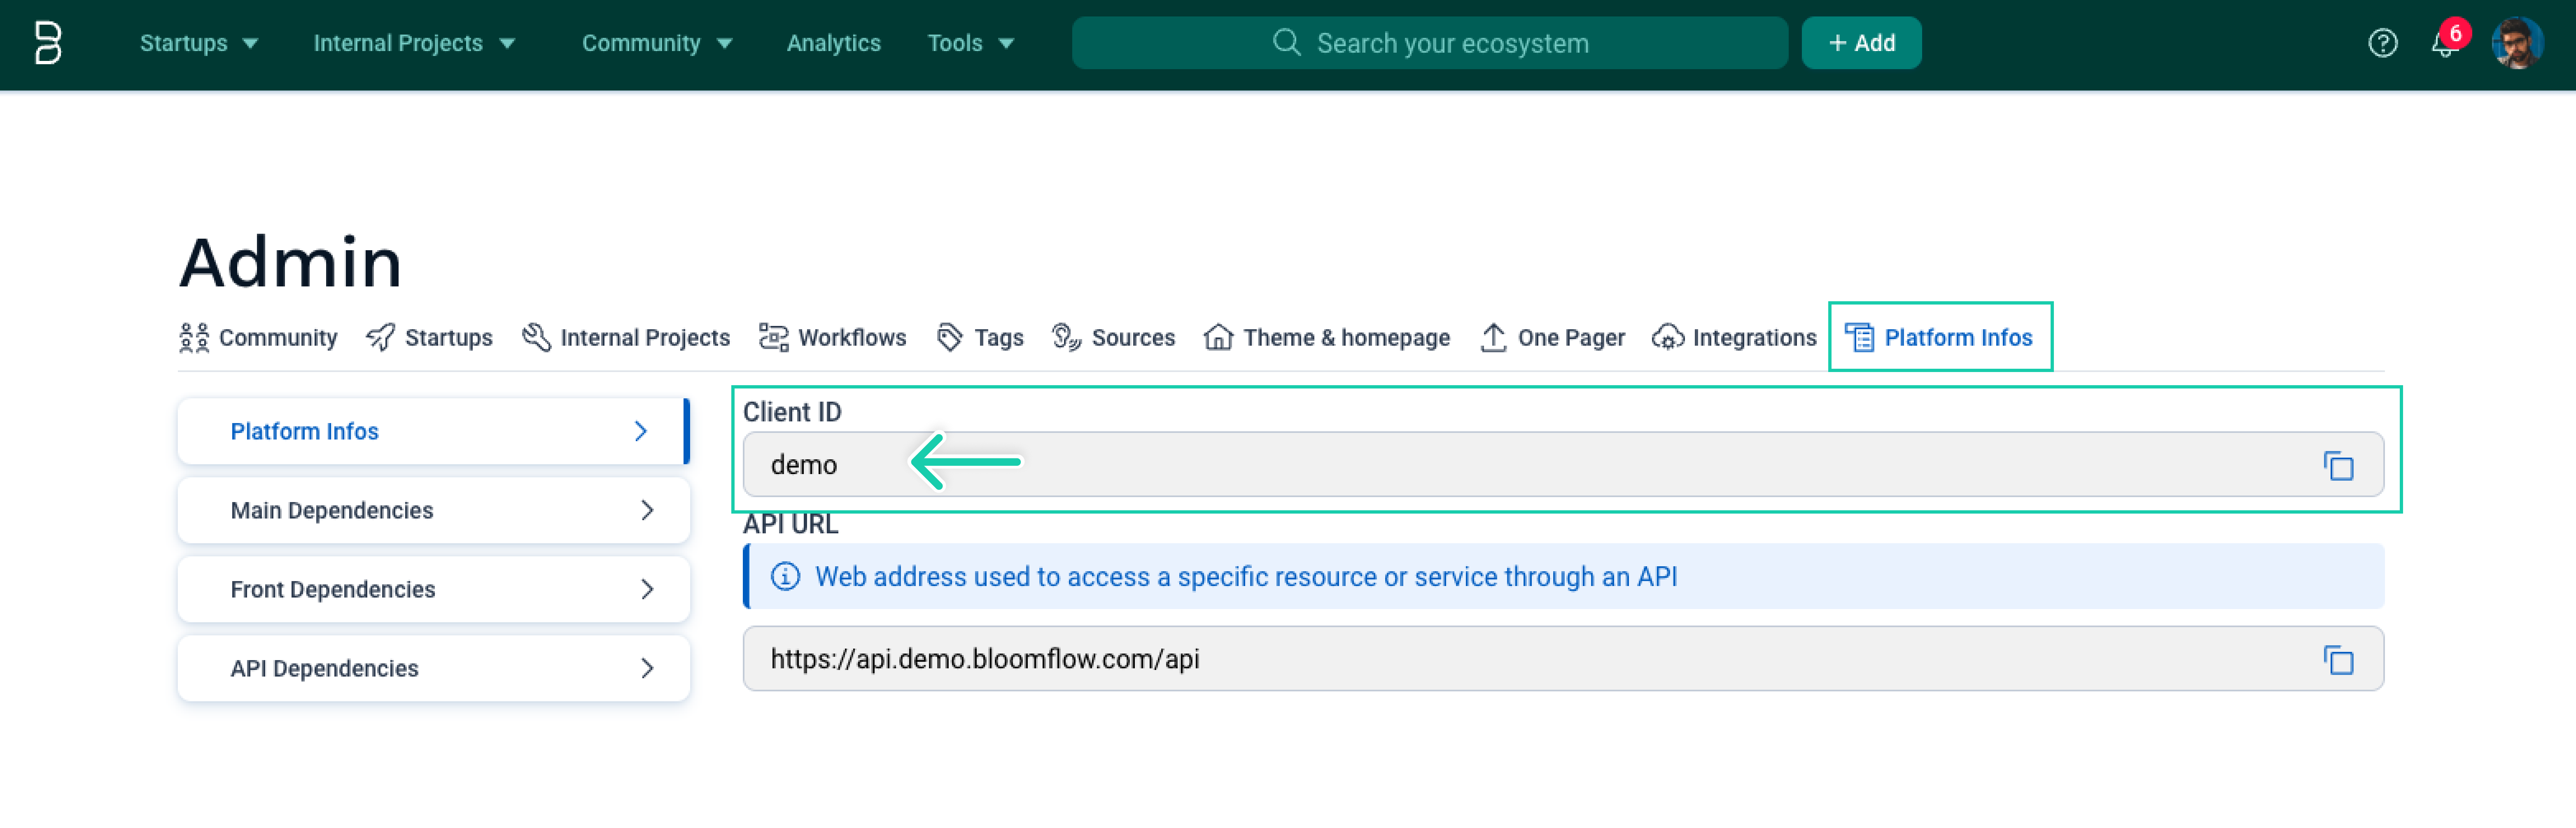
https://api.CLIENT_ID.bloomflow.com/api/public/scim -
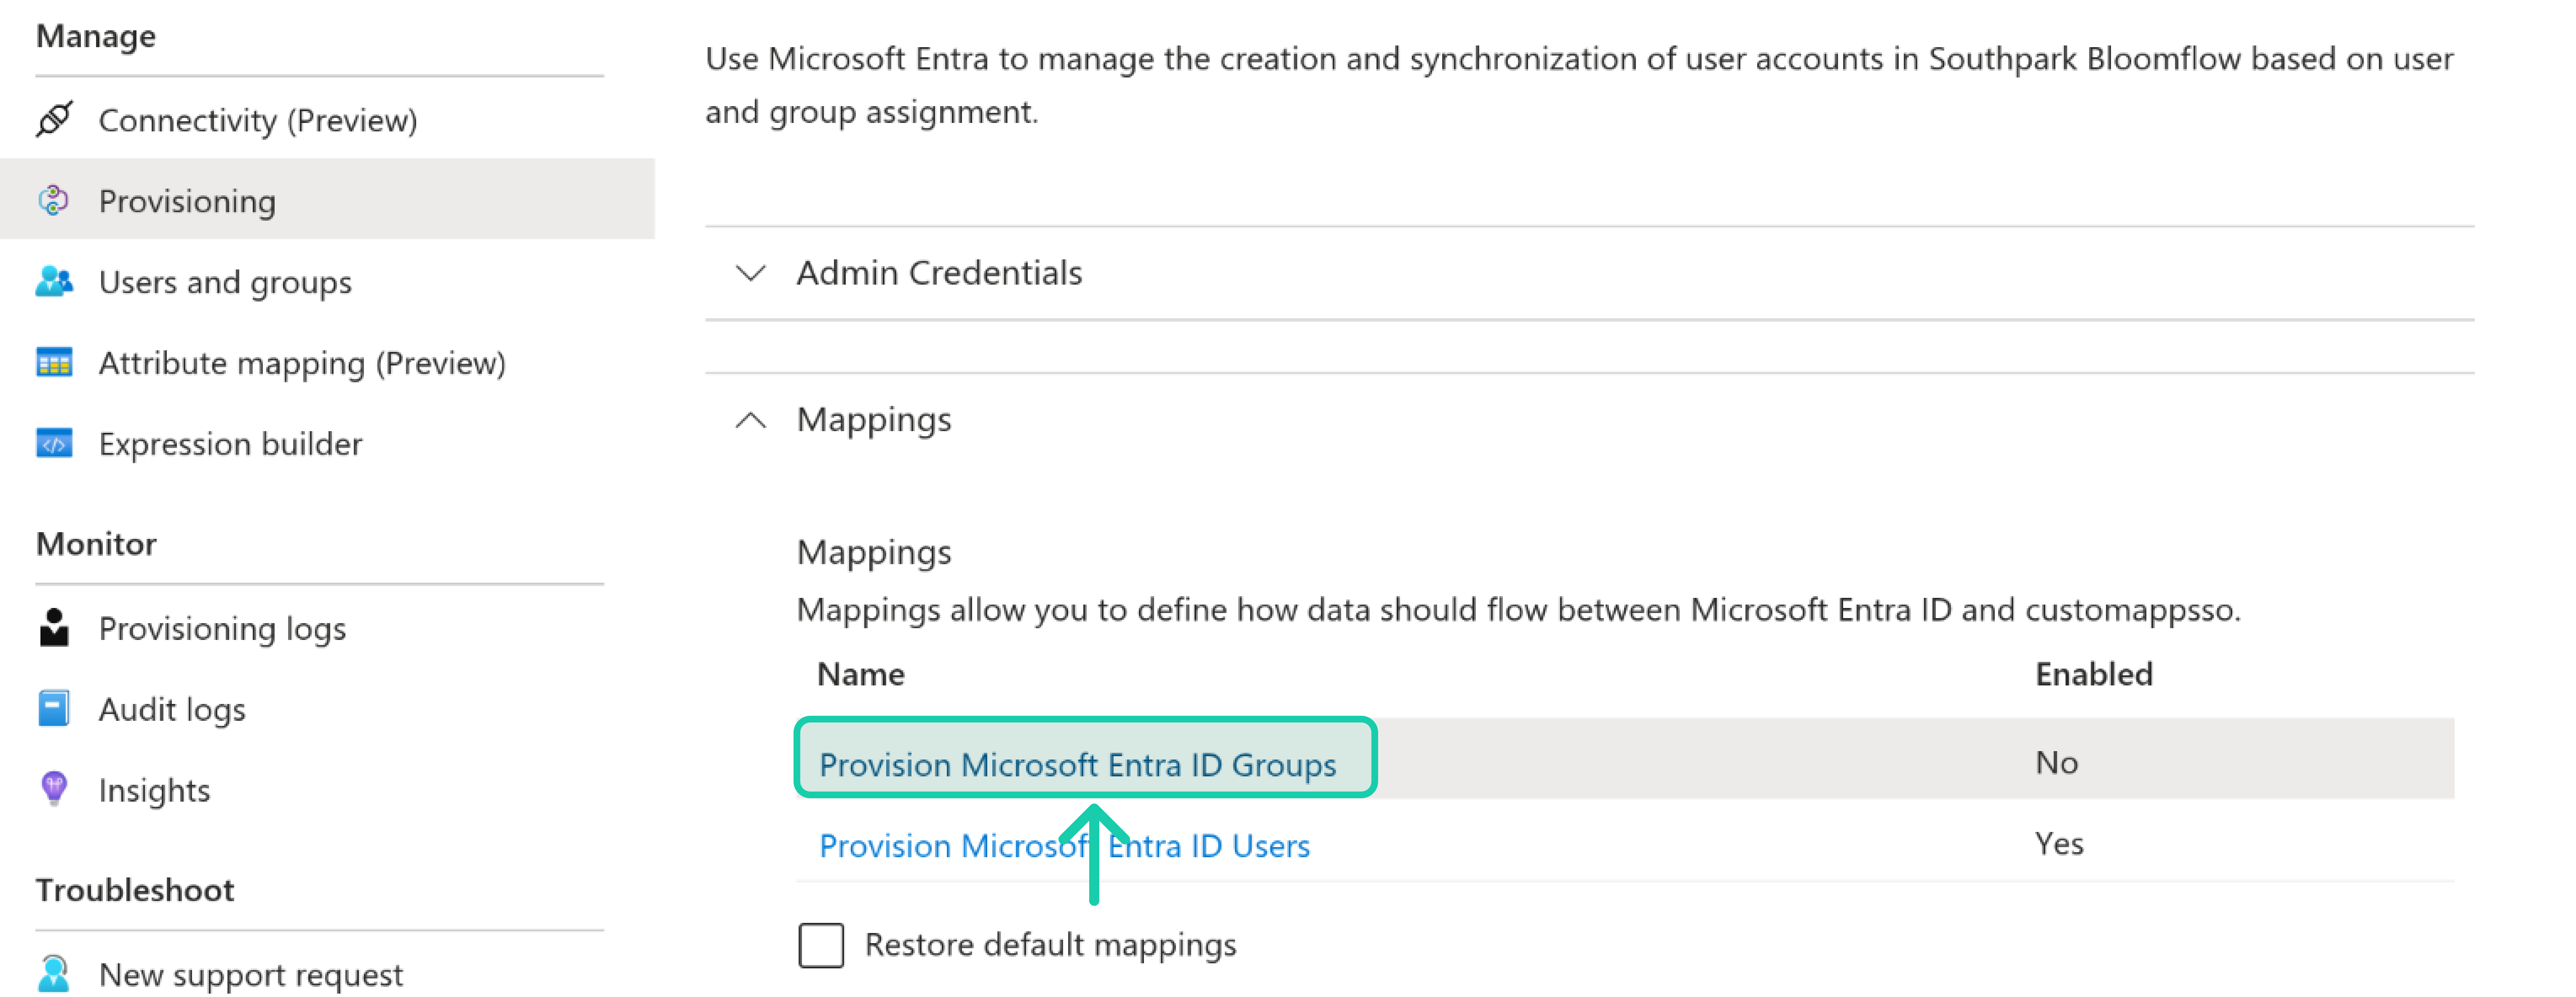
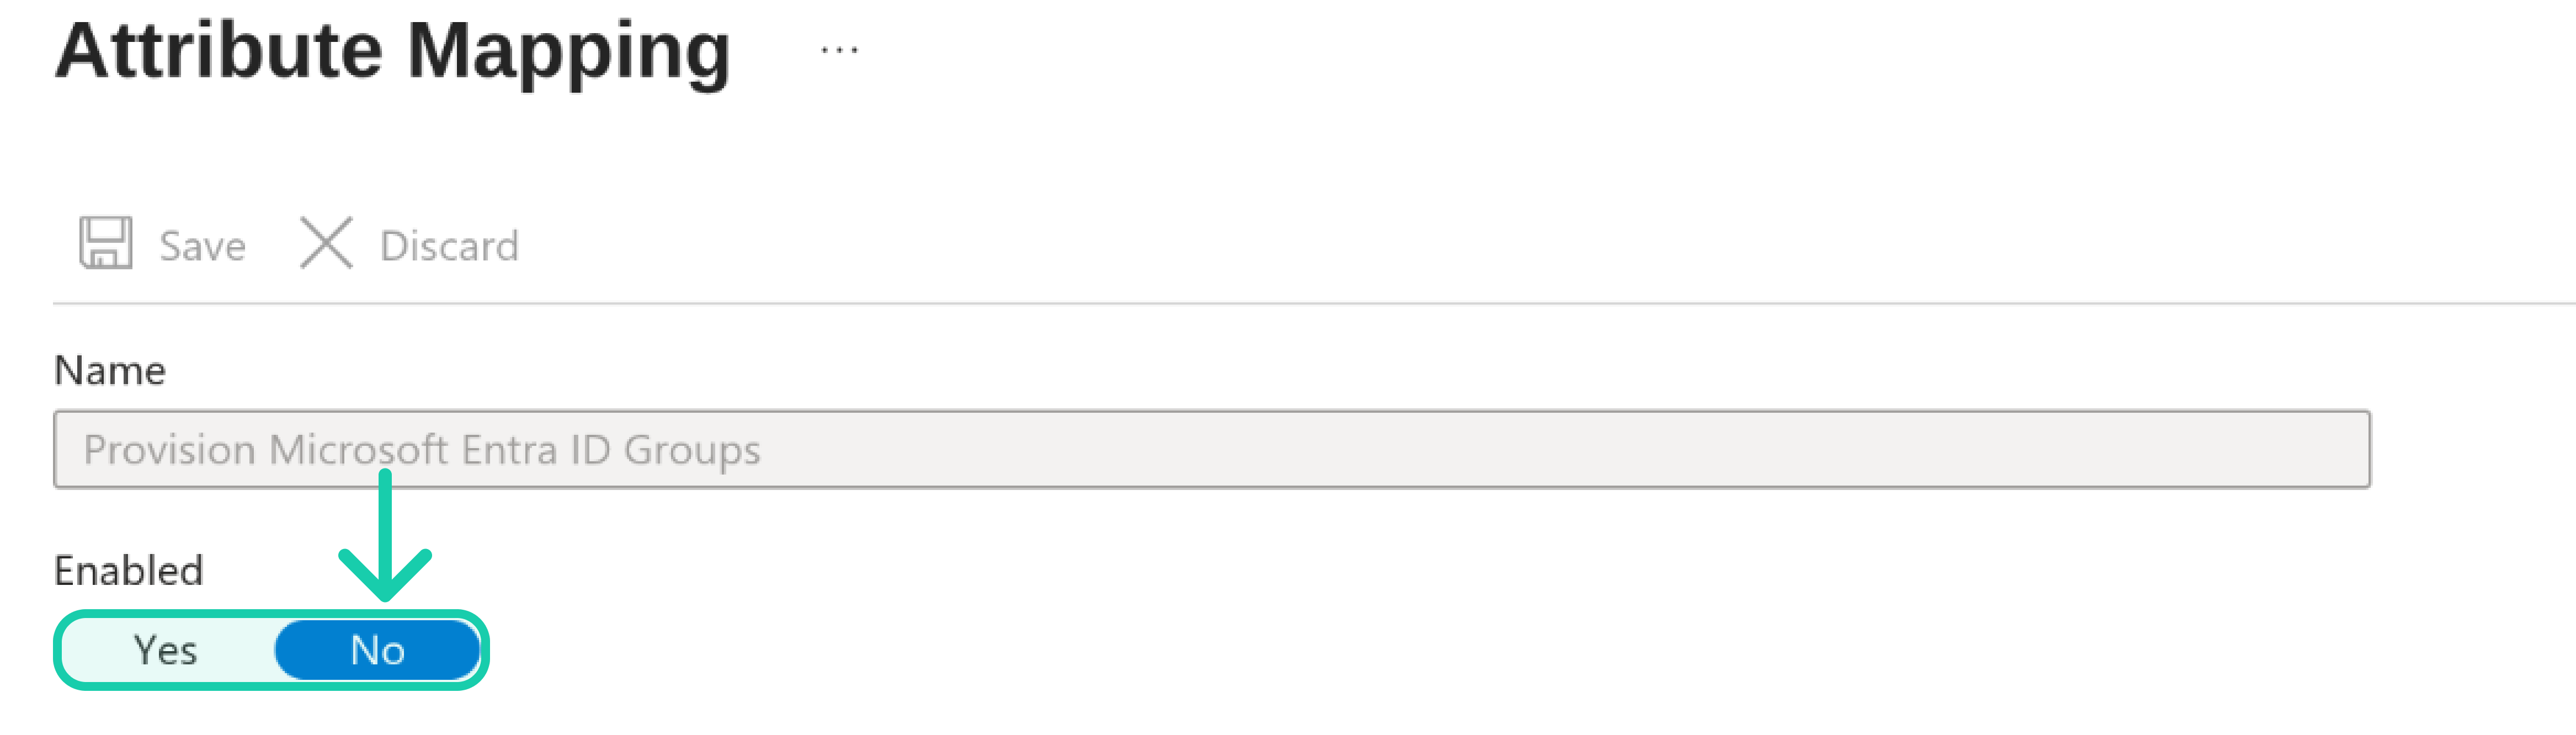
In the Mapping section, make sure to disable Provision Microsoft Entra ID Groups since we do not support it yet.
-
In the Notification Email field, enter the email address of a person or group who should receive the provisioning error notifications and select the Send an email notification when a failure occurs check box.
-
Select Save.
Step 3: Mapping Attributes
In order to facilitate seamless integration and automatic user provisioning through SCIM with Microsoft Entra ID (Azure AD), Bloomflow requires a proper mapping of user attributes between SCIM standards and our application's internal data structure. This mapping ensures that user information such as names, emails, status, and other key attributes are correctly synchronized. By aligning these attributes, Bloomflow can maintain accurate and up-to-date user data, streamlining both user management within the platform.
Required attributes mapping
SCIM attributes needs to be map to an email value for us to match manually added users in our database and to be able to create a user. (see the section down below to understand what attributes are necessary for us to create a user)
| SCIM Attributes | Microsoft Entra ID Attributes | Bloomflow Attributes | Type | Required |
|---|---|---|---|---|
| userName | userPrincipalName | string | * | |
| emails[type eq “work”].value | userPrincipalName | string | * |
Required attributes to create a user into Bloomflow
Make sure those attributes are mapped correctly or the provisioning will not work correctly. Do not hesitate to contact our support support@bloomflow.com if you have any question.
| SCIM Attributes | Bloomflow Attributes | Type | Note | required |
|---|---|---|---|---|
| emails[type eq “work”].value | string | * | ||
| name.givenName | firstName | string | * | |
| name.familyName | lastName | string | * | |
| externalId | externalId | ObjectId | * | |
| active | suspended | boolean | Used to soft delete a user. Will disable access to the platform | |
| phoneNumbers[type eq “work”].value | phone | string | ||
| title | job | string | ||
| addresses[type eq “work”].locality | location | string | ||
| urn:ietf:[...]enterprise:2.0:User:department | business_unit | string |
During the configuration of user provisioning, it is your responsibility to decide which additional information regarding your users is transmitted to our platform. Any additional data sent will be securely stored and may be used by administrators in your Bloomflow platform. However, we have no control over information that is inadvertently sent. We strongly recommend reviewing the transmitted data to ensure compliance with data minimization principles in accordance with the GDPR.
Required adjustements
There are 4 main adjustments you will need to make that deviate from the defaults.
Adjustment 1: "userPrincipalName" required
-
In the Mappings section, select Provision Microsoft Entra ID Users

-
In the table view, update the
userNameAttribute by clicking the Edit button.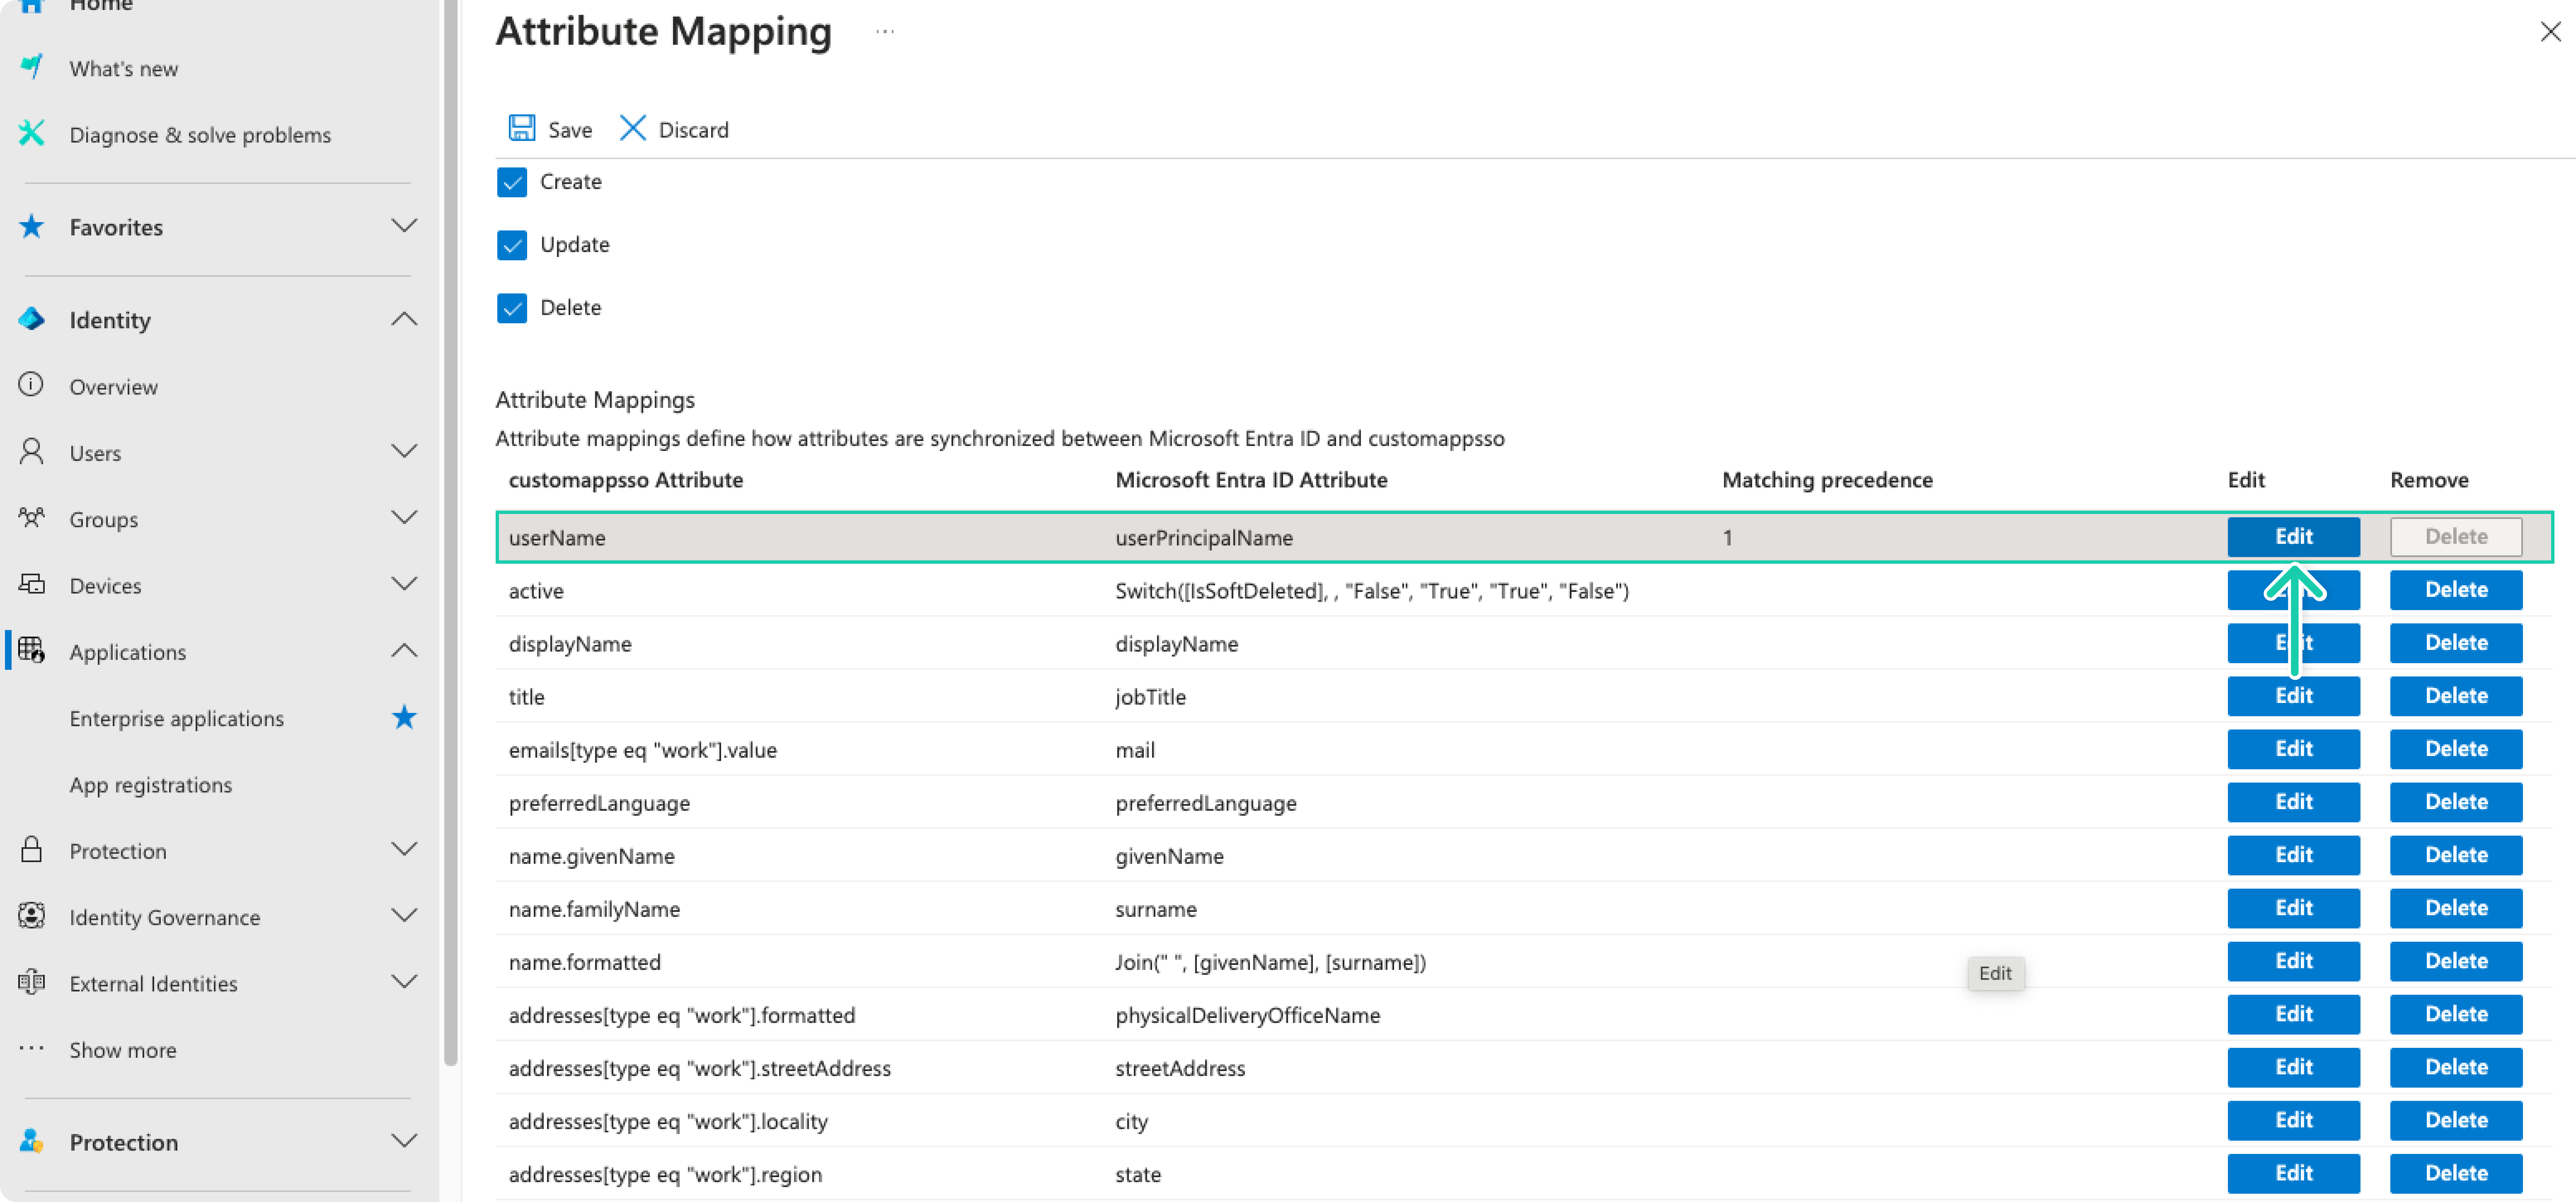
-
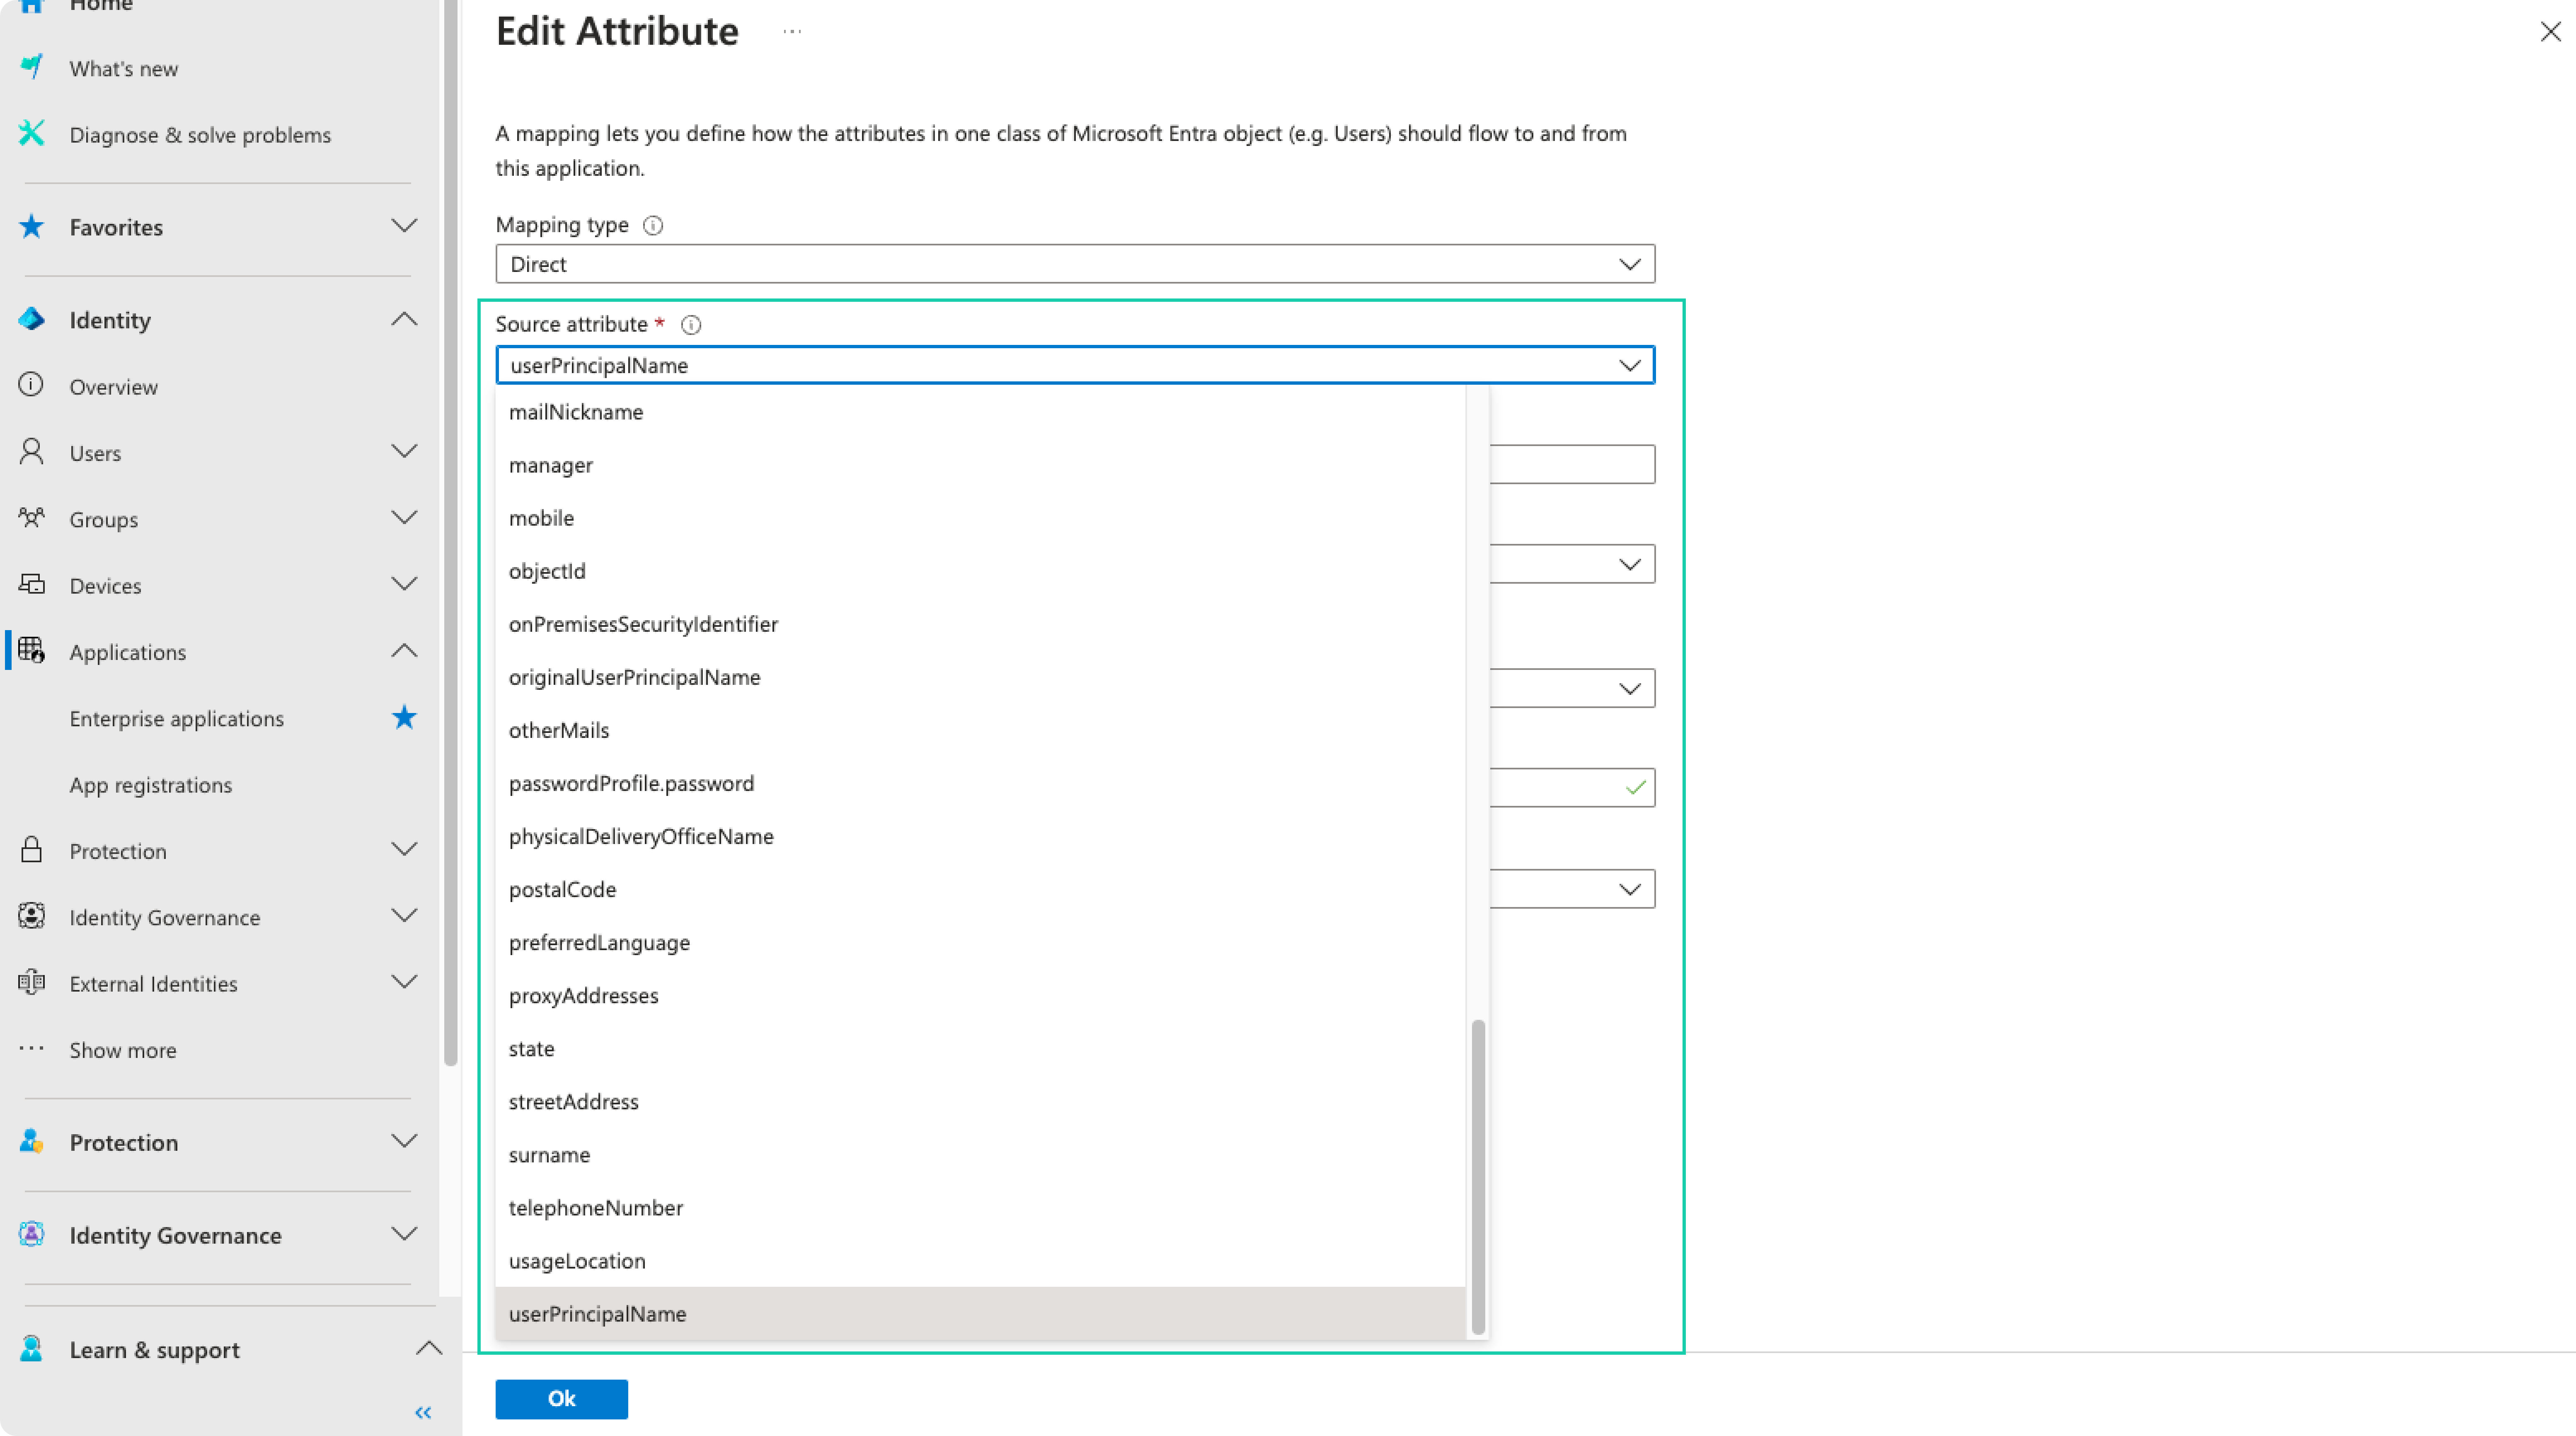
In the Edit Attribute form, change the Source Attribute to userPrincipalName and click OK
-
Apply the same modification to the attribute emails[type eq "work"].value by setting its Source Attribute to userPrincipalName and click OK
-
Click Save and confirm the changes.
Adjustment 2: Mandatory fields
-
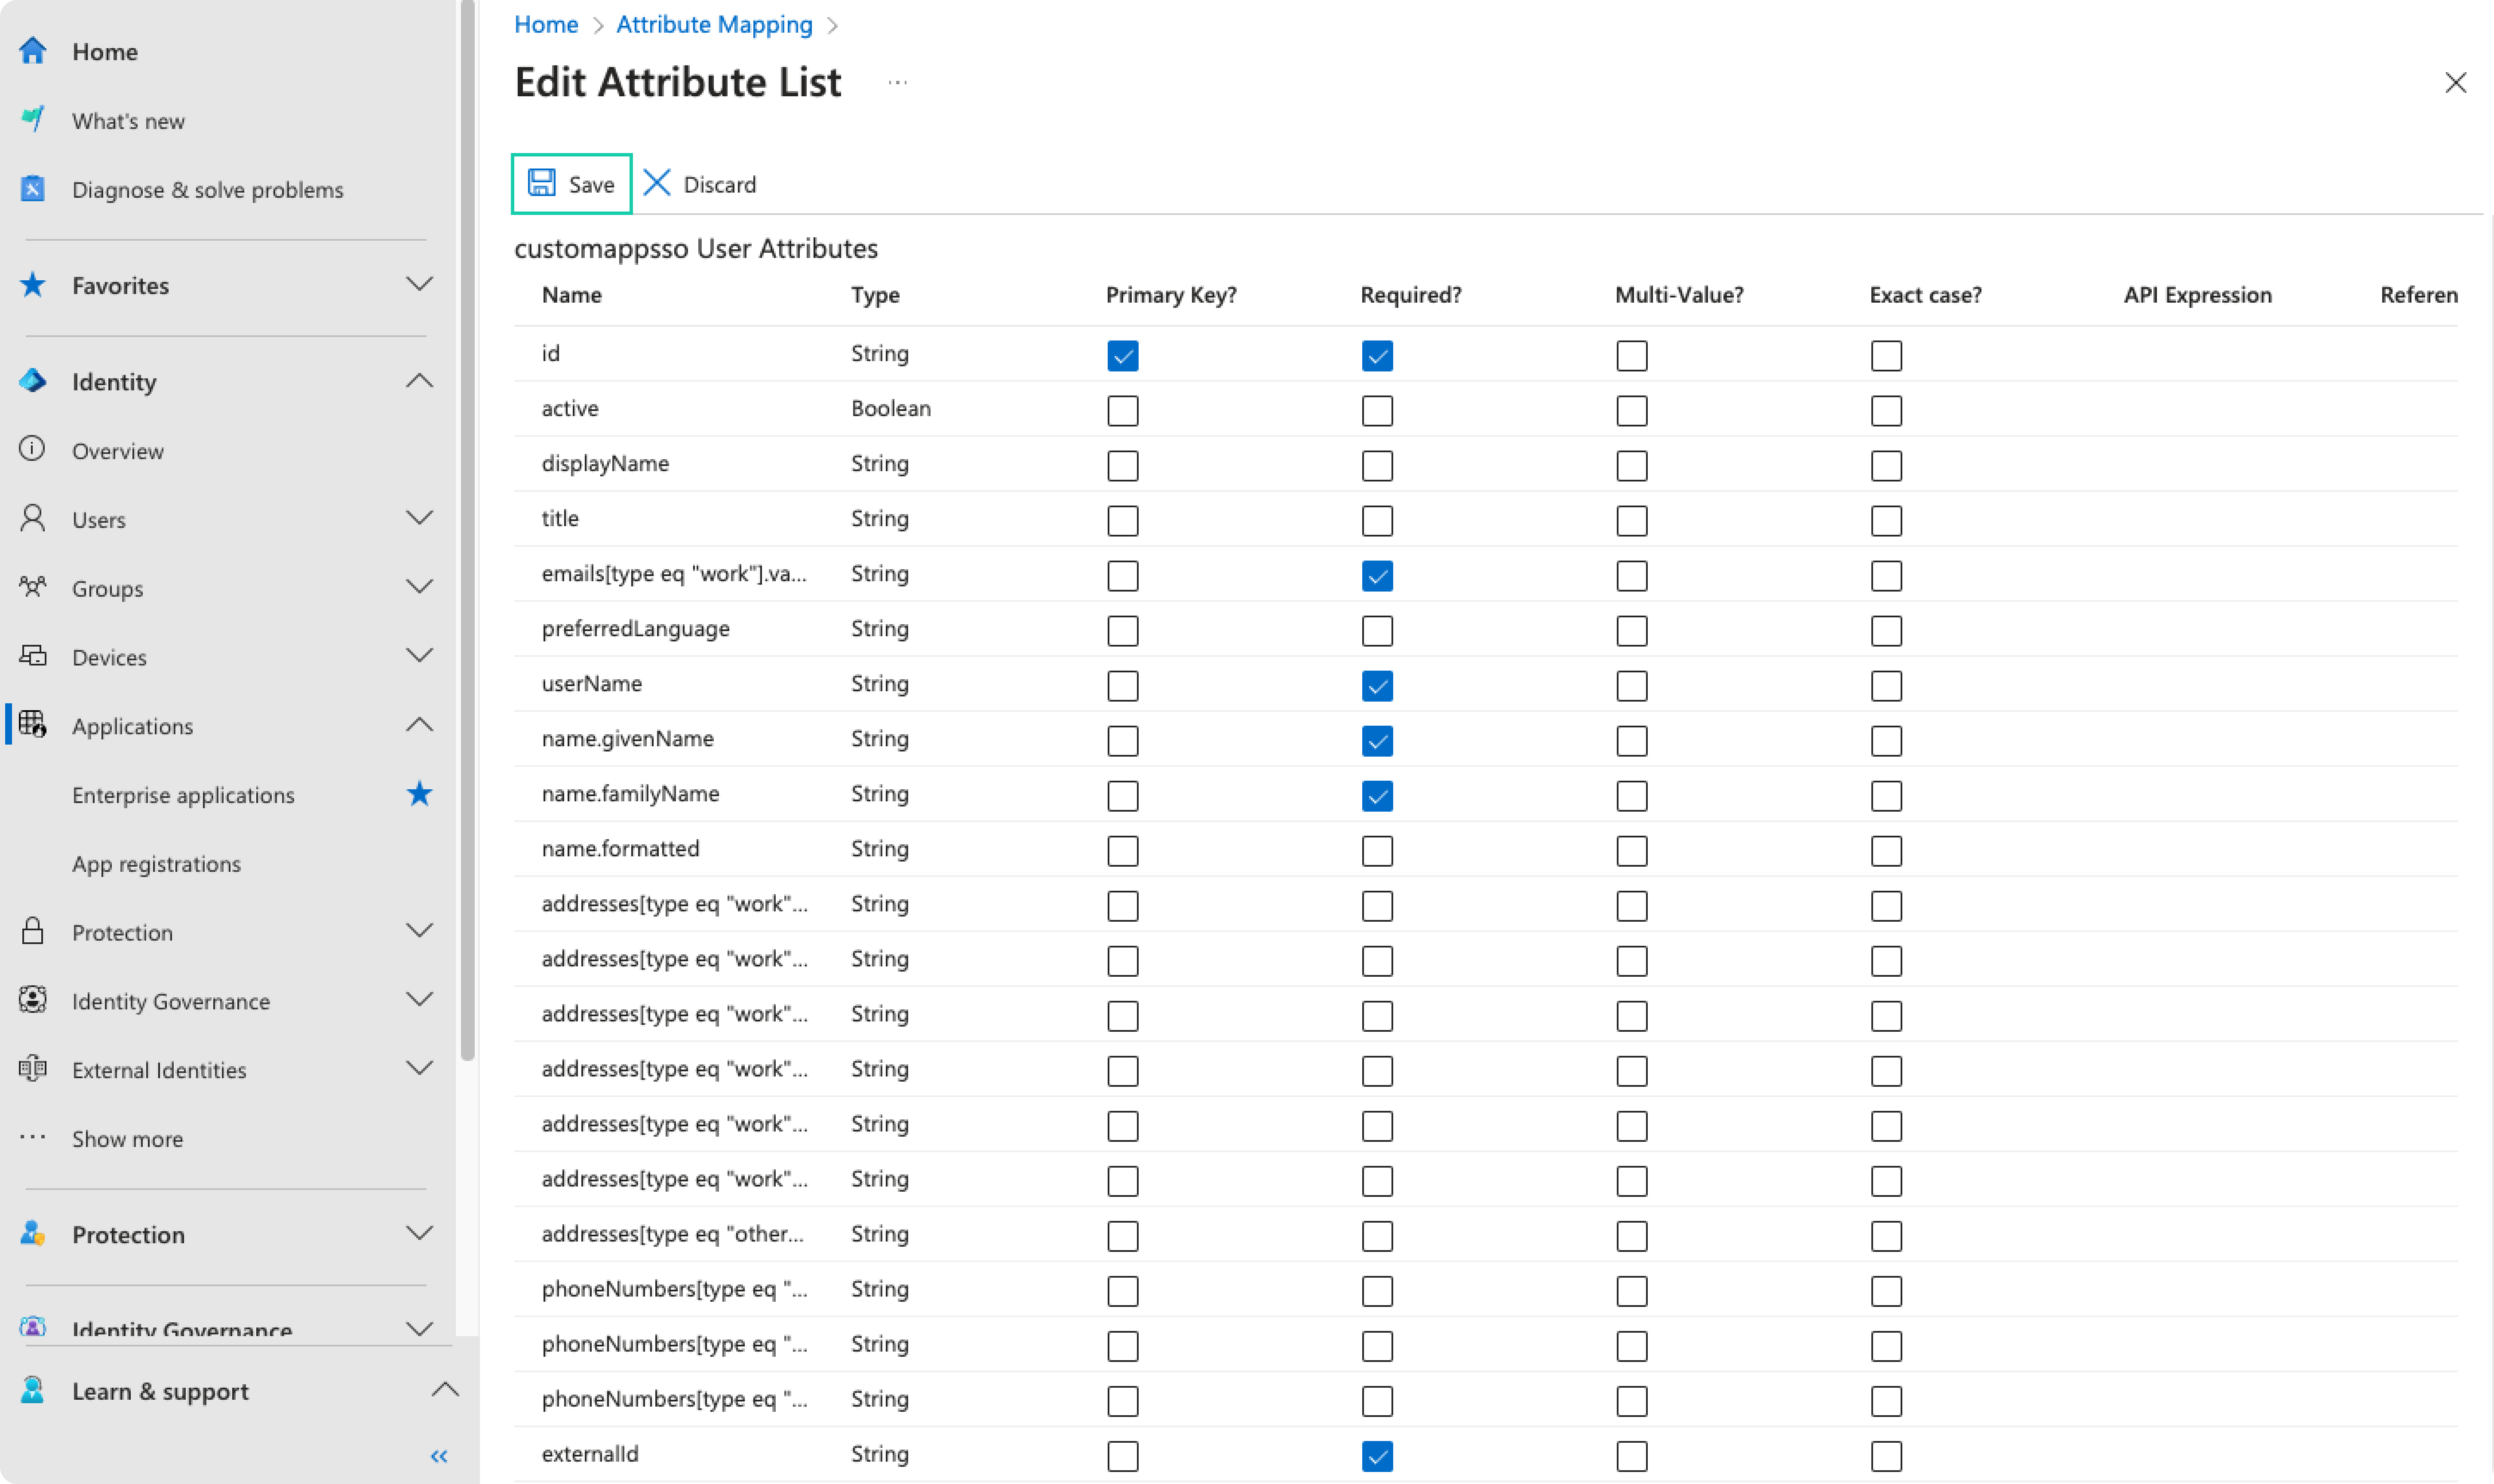
Scroll down the Attribute Mapping page, check the Show advanced options and click on Edit attribute list for YOUR_APP_NAME
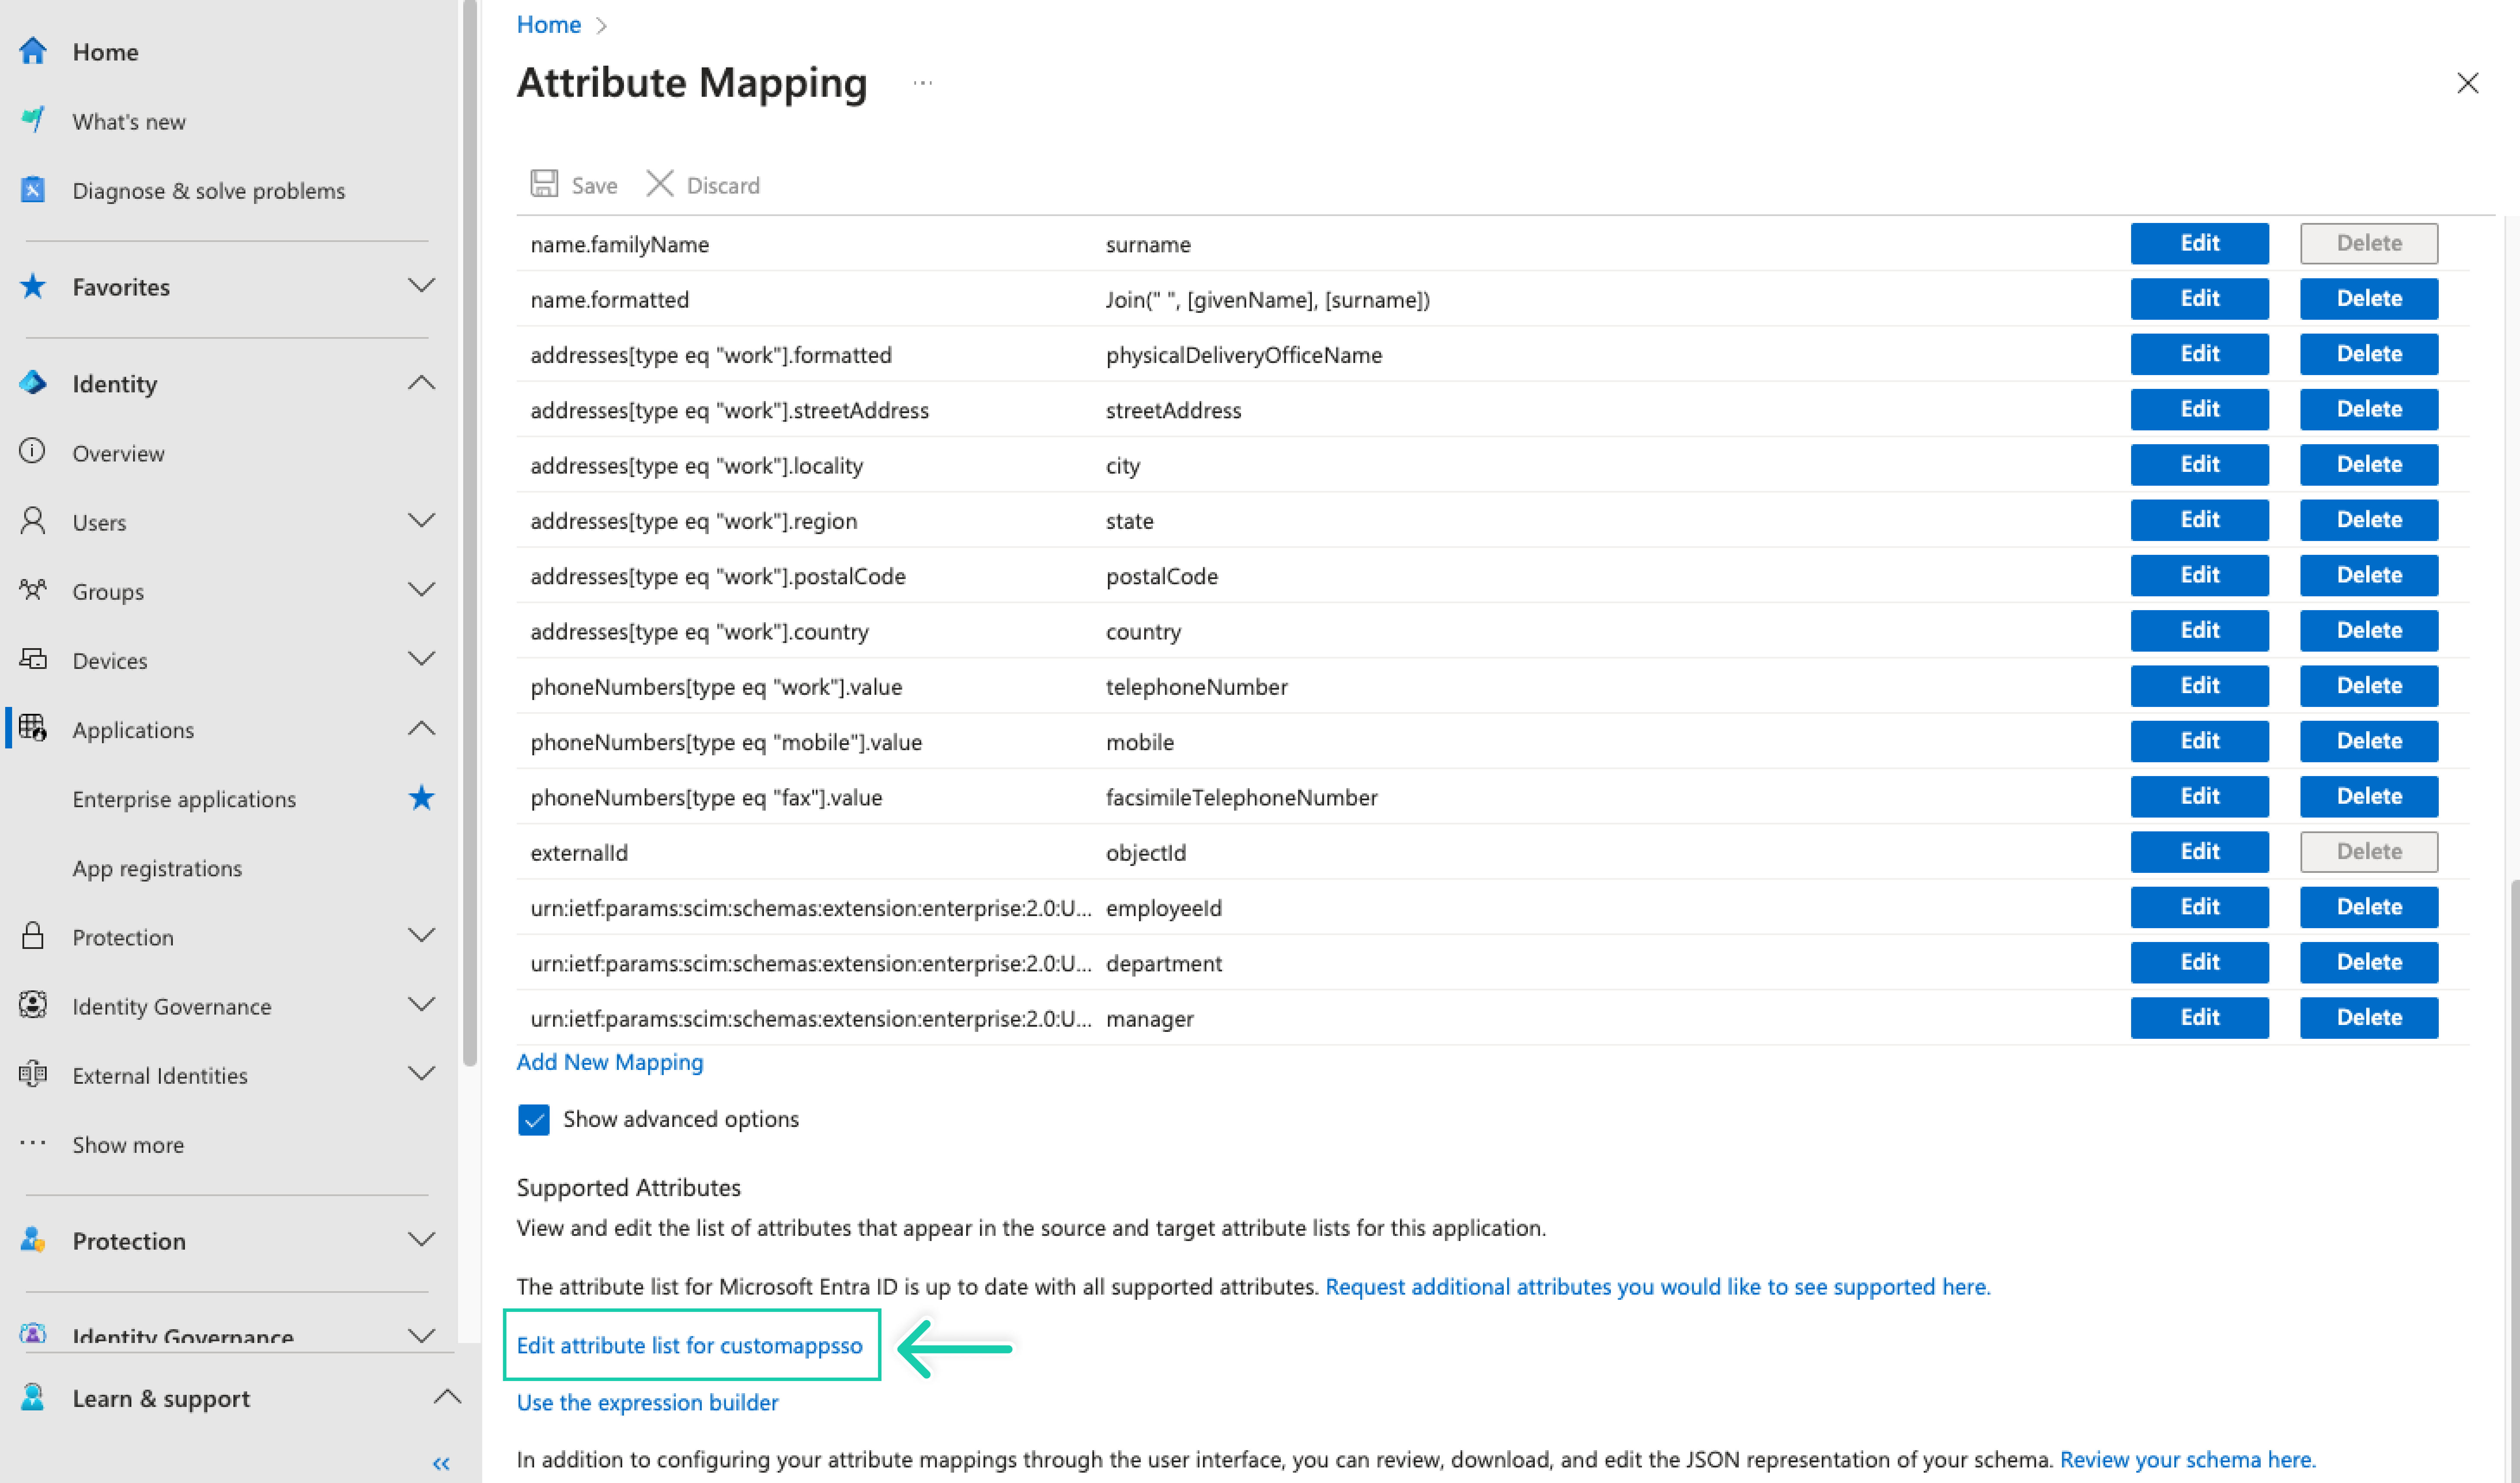
-
Set
emails[type eq "work"].value,userName,name.givenName,name.familyNameandexternalIdas required.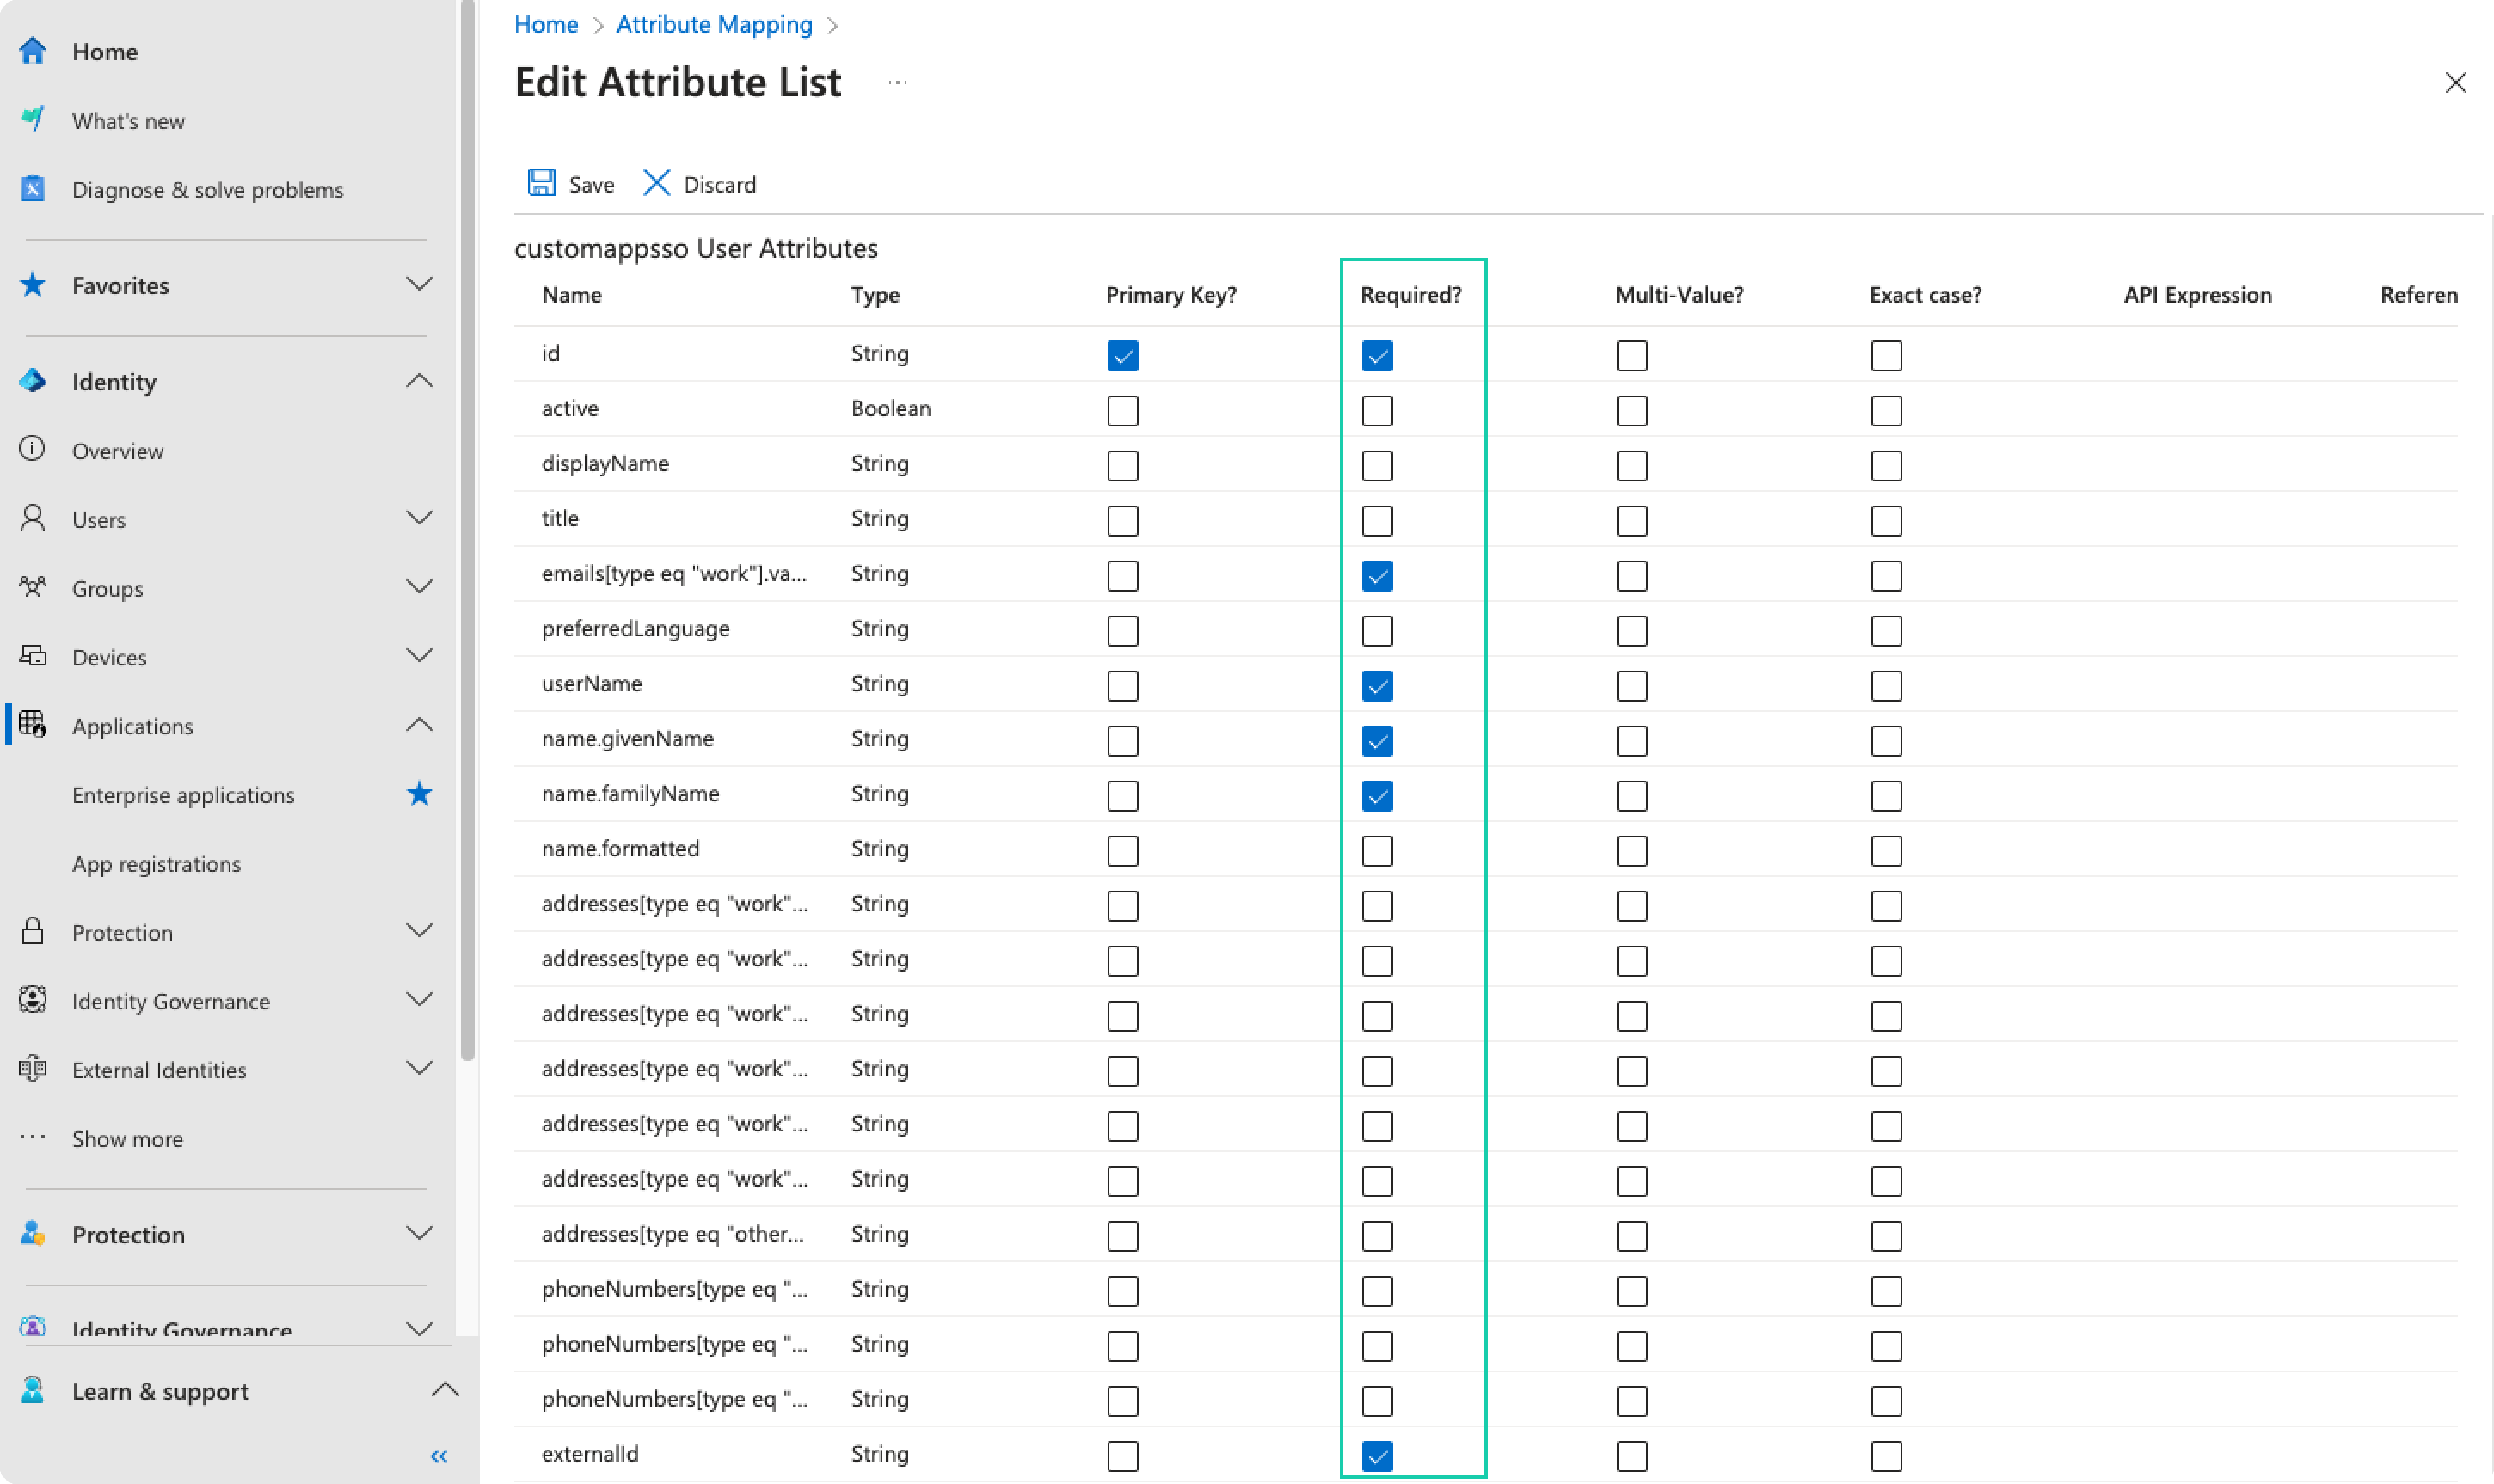
-
Click Save and confirm the changes.
Step 4: Enabled Provisioning
- Enable the Microsoft Entra ID (Azure AD) provisioning service for Bloomflow by changing the Provisioning Status to On in the Settings section.
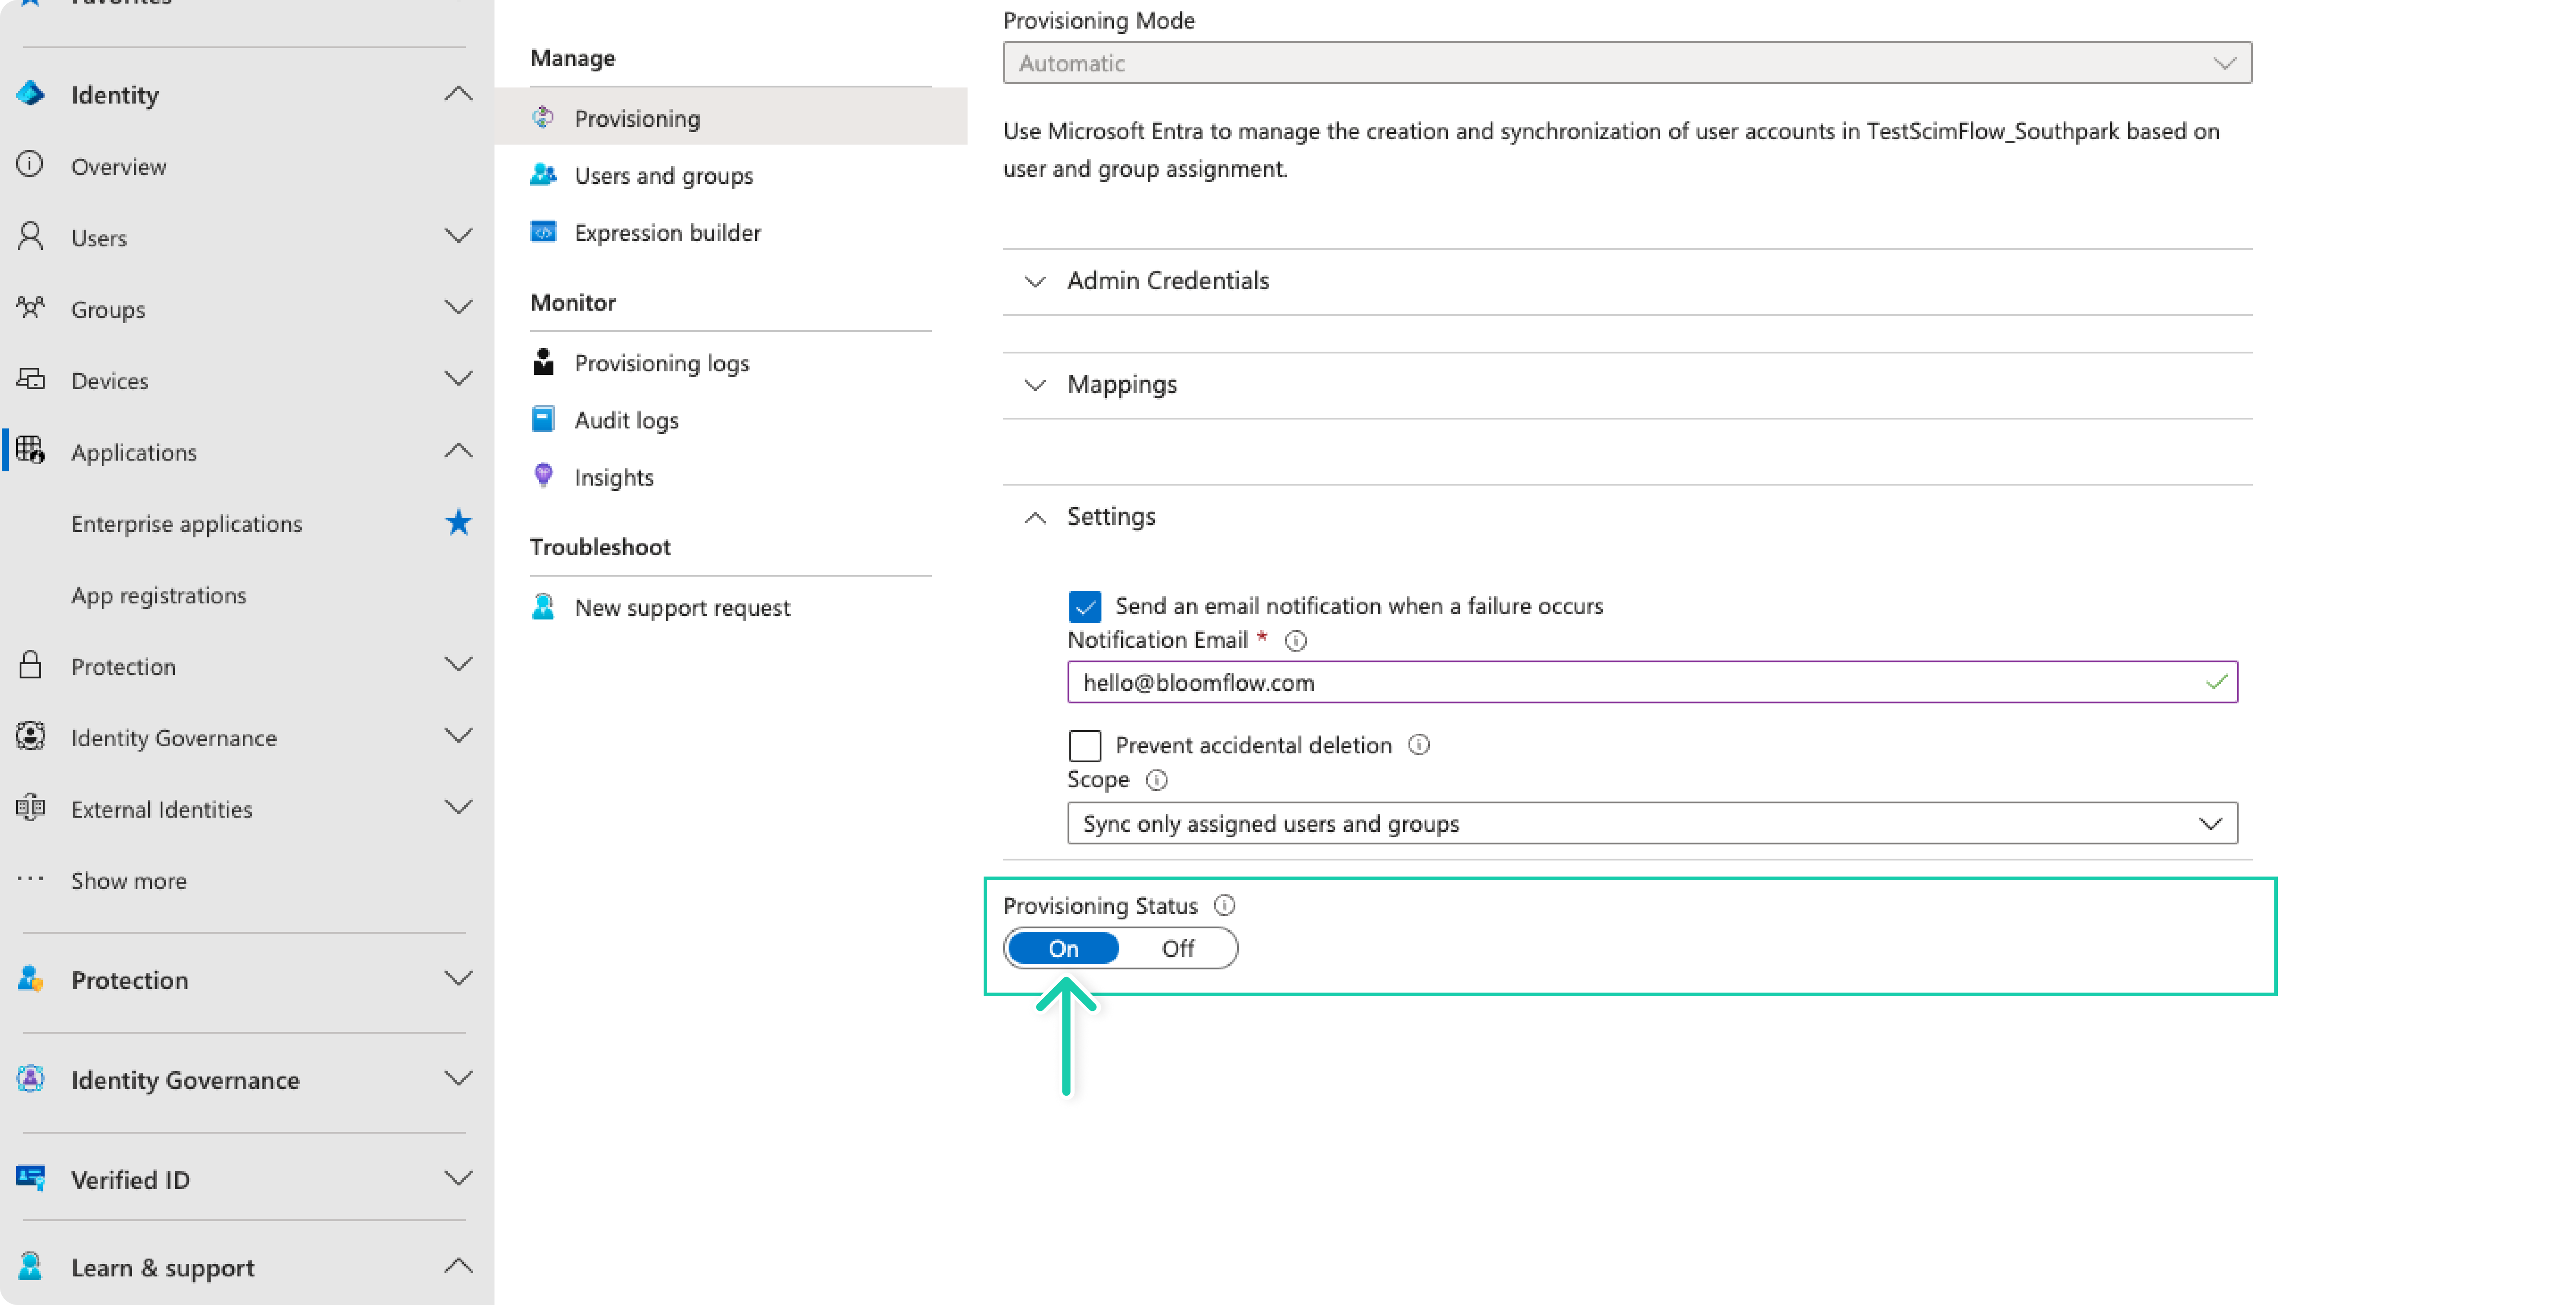
- Define the users that you would like to provision to Bloomflow by choosing “Sync only assigned users and groups”.
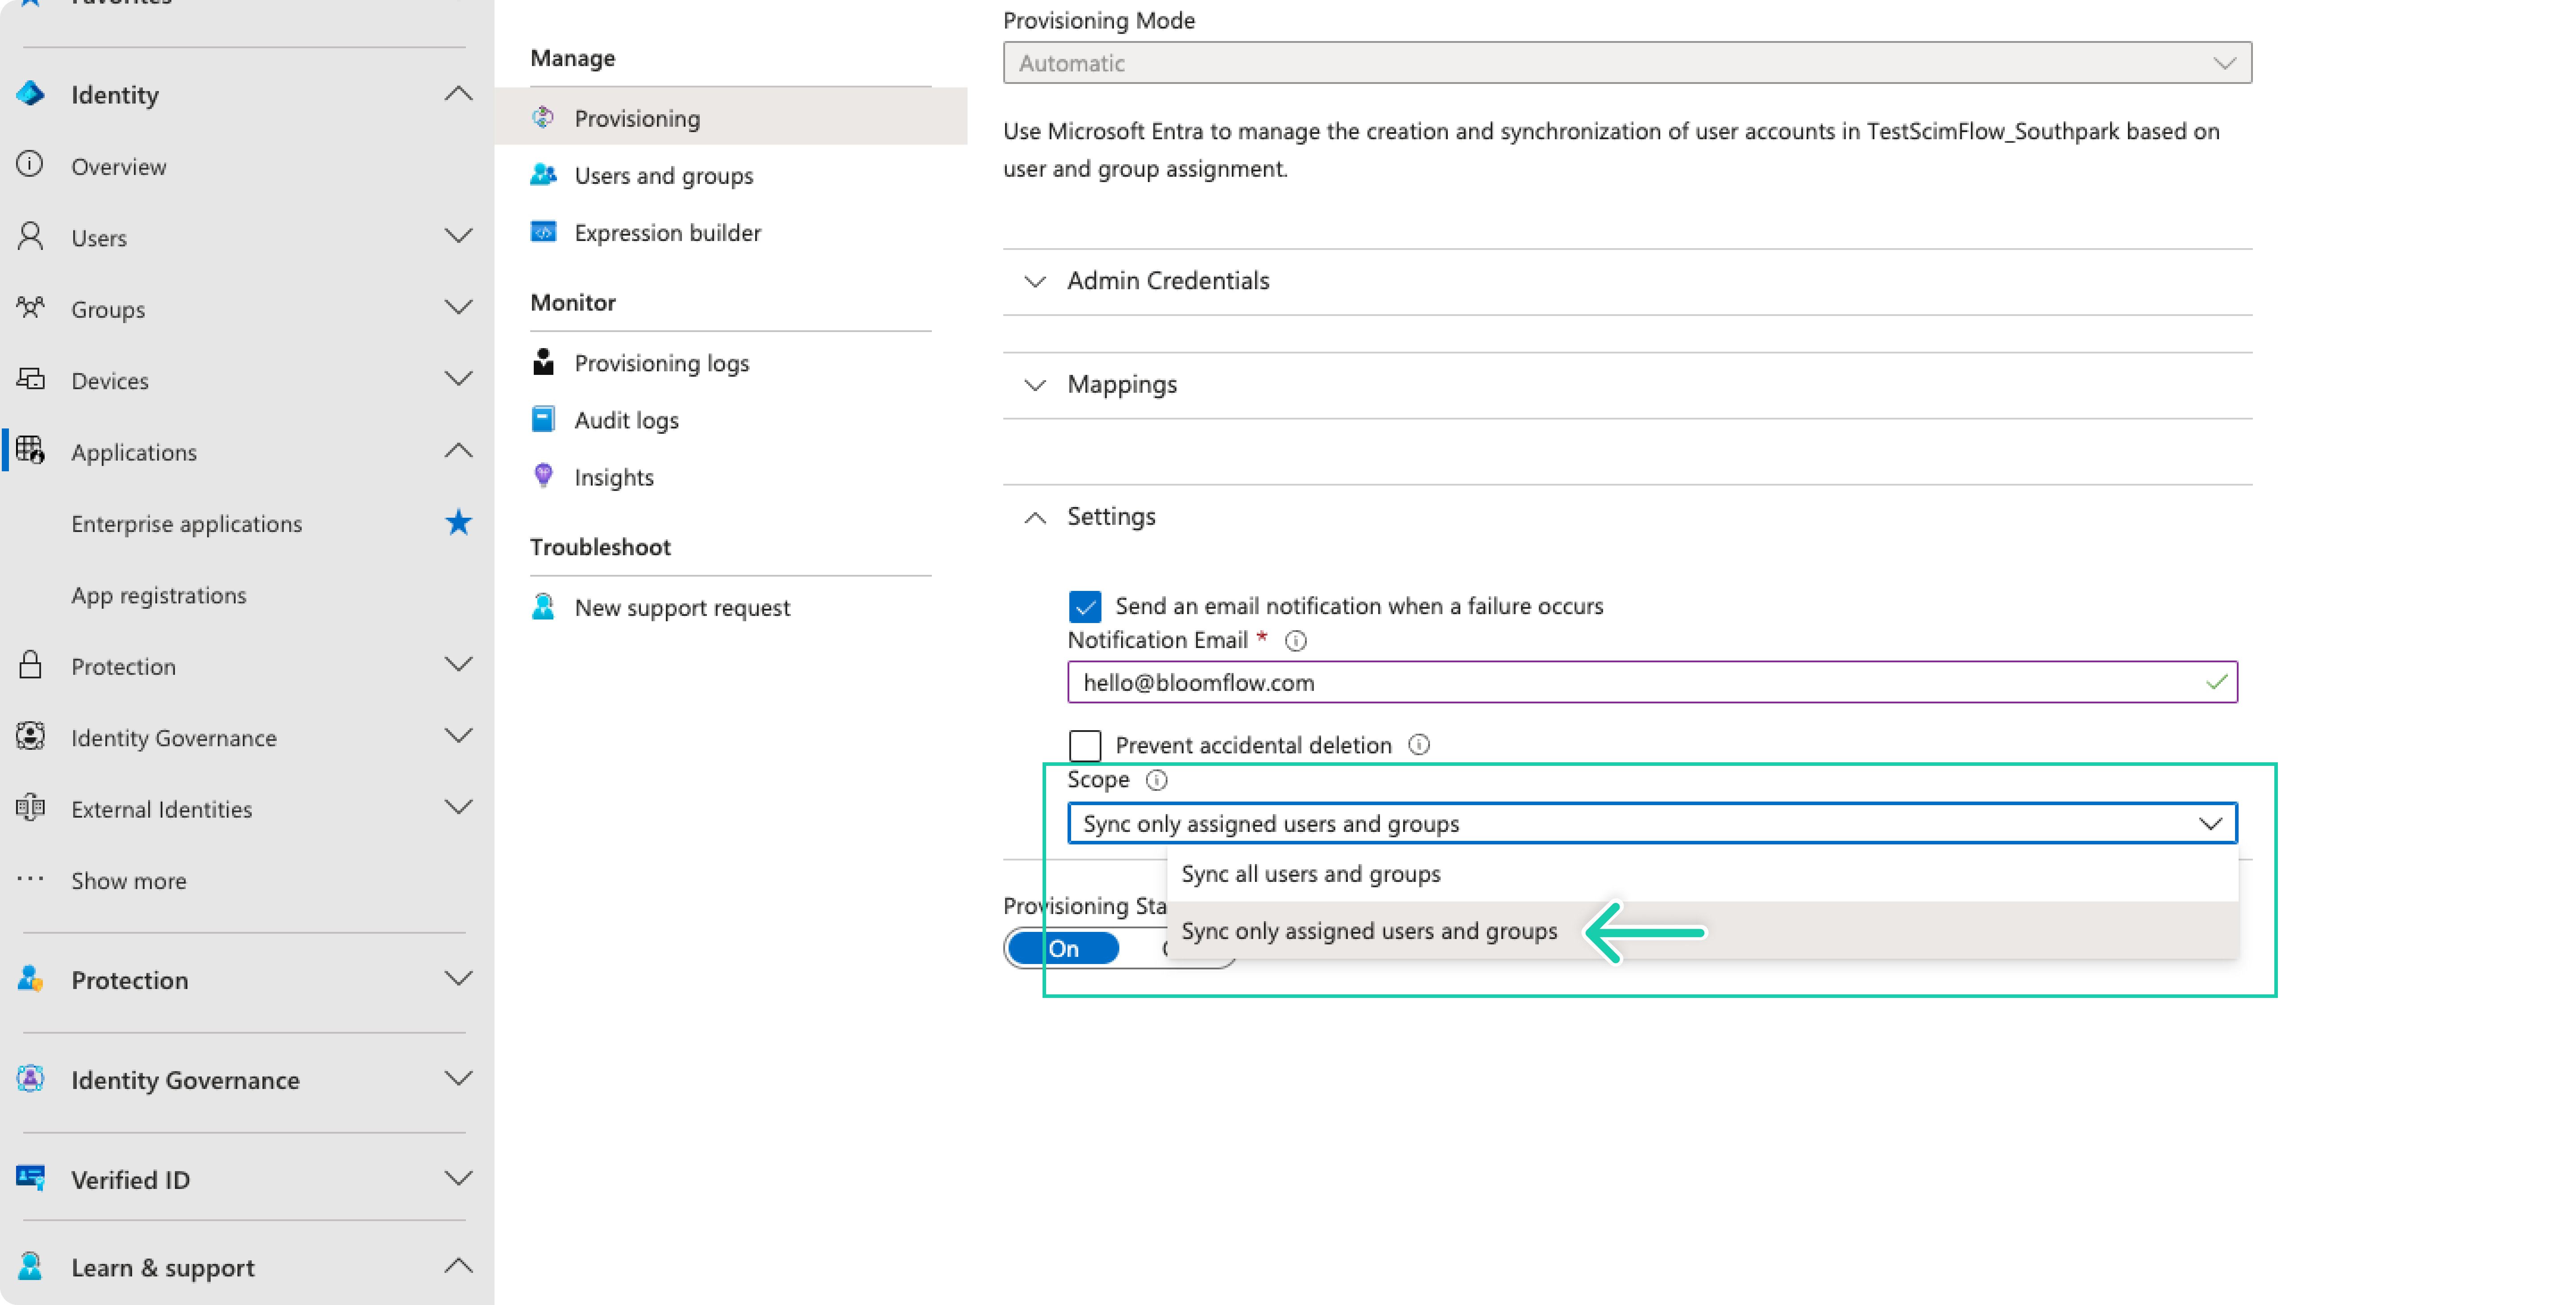
- When you're ready to provision, click Save.
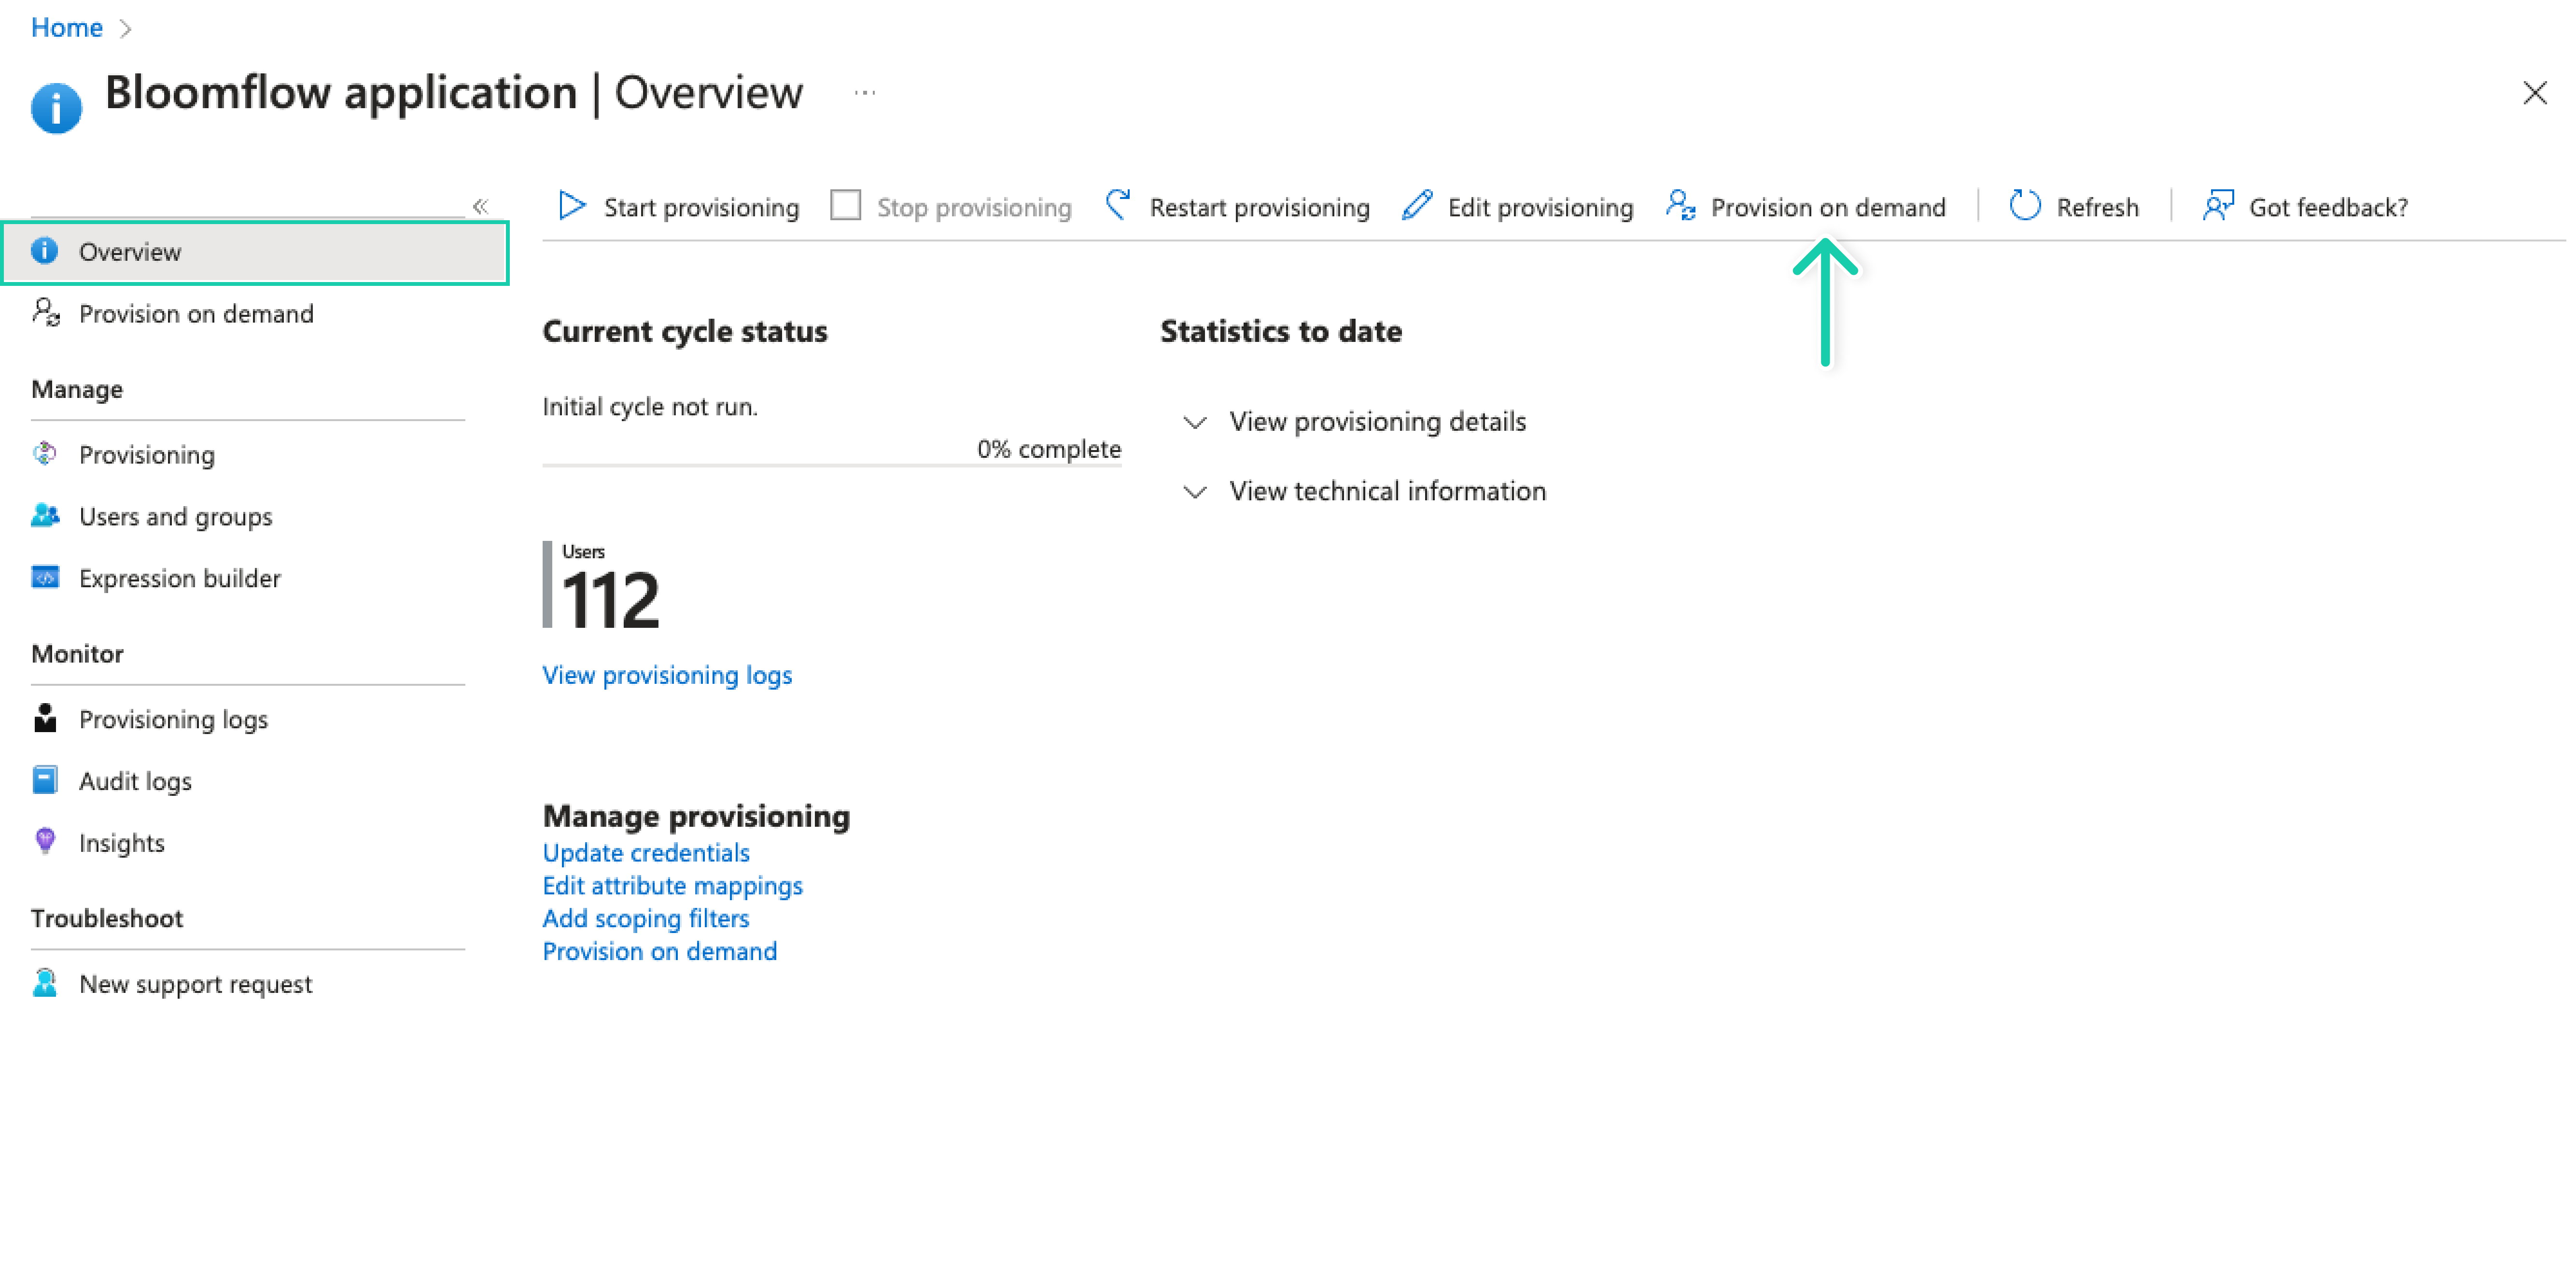
Test provisioning on Demand
Before starting automatic provisioning, you can verify everything works by using Provision on Demand to provision a test user.
Enabled Automatic Provision
If everything went well, go to Overview and click Start provisioning to enable automatic provisioning if it hasn't started yet, or click Restart provisioning if it's already running.
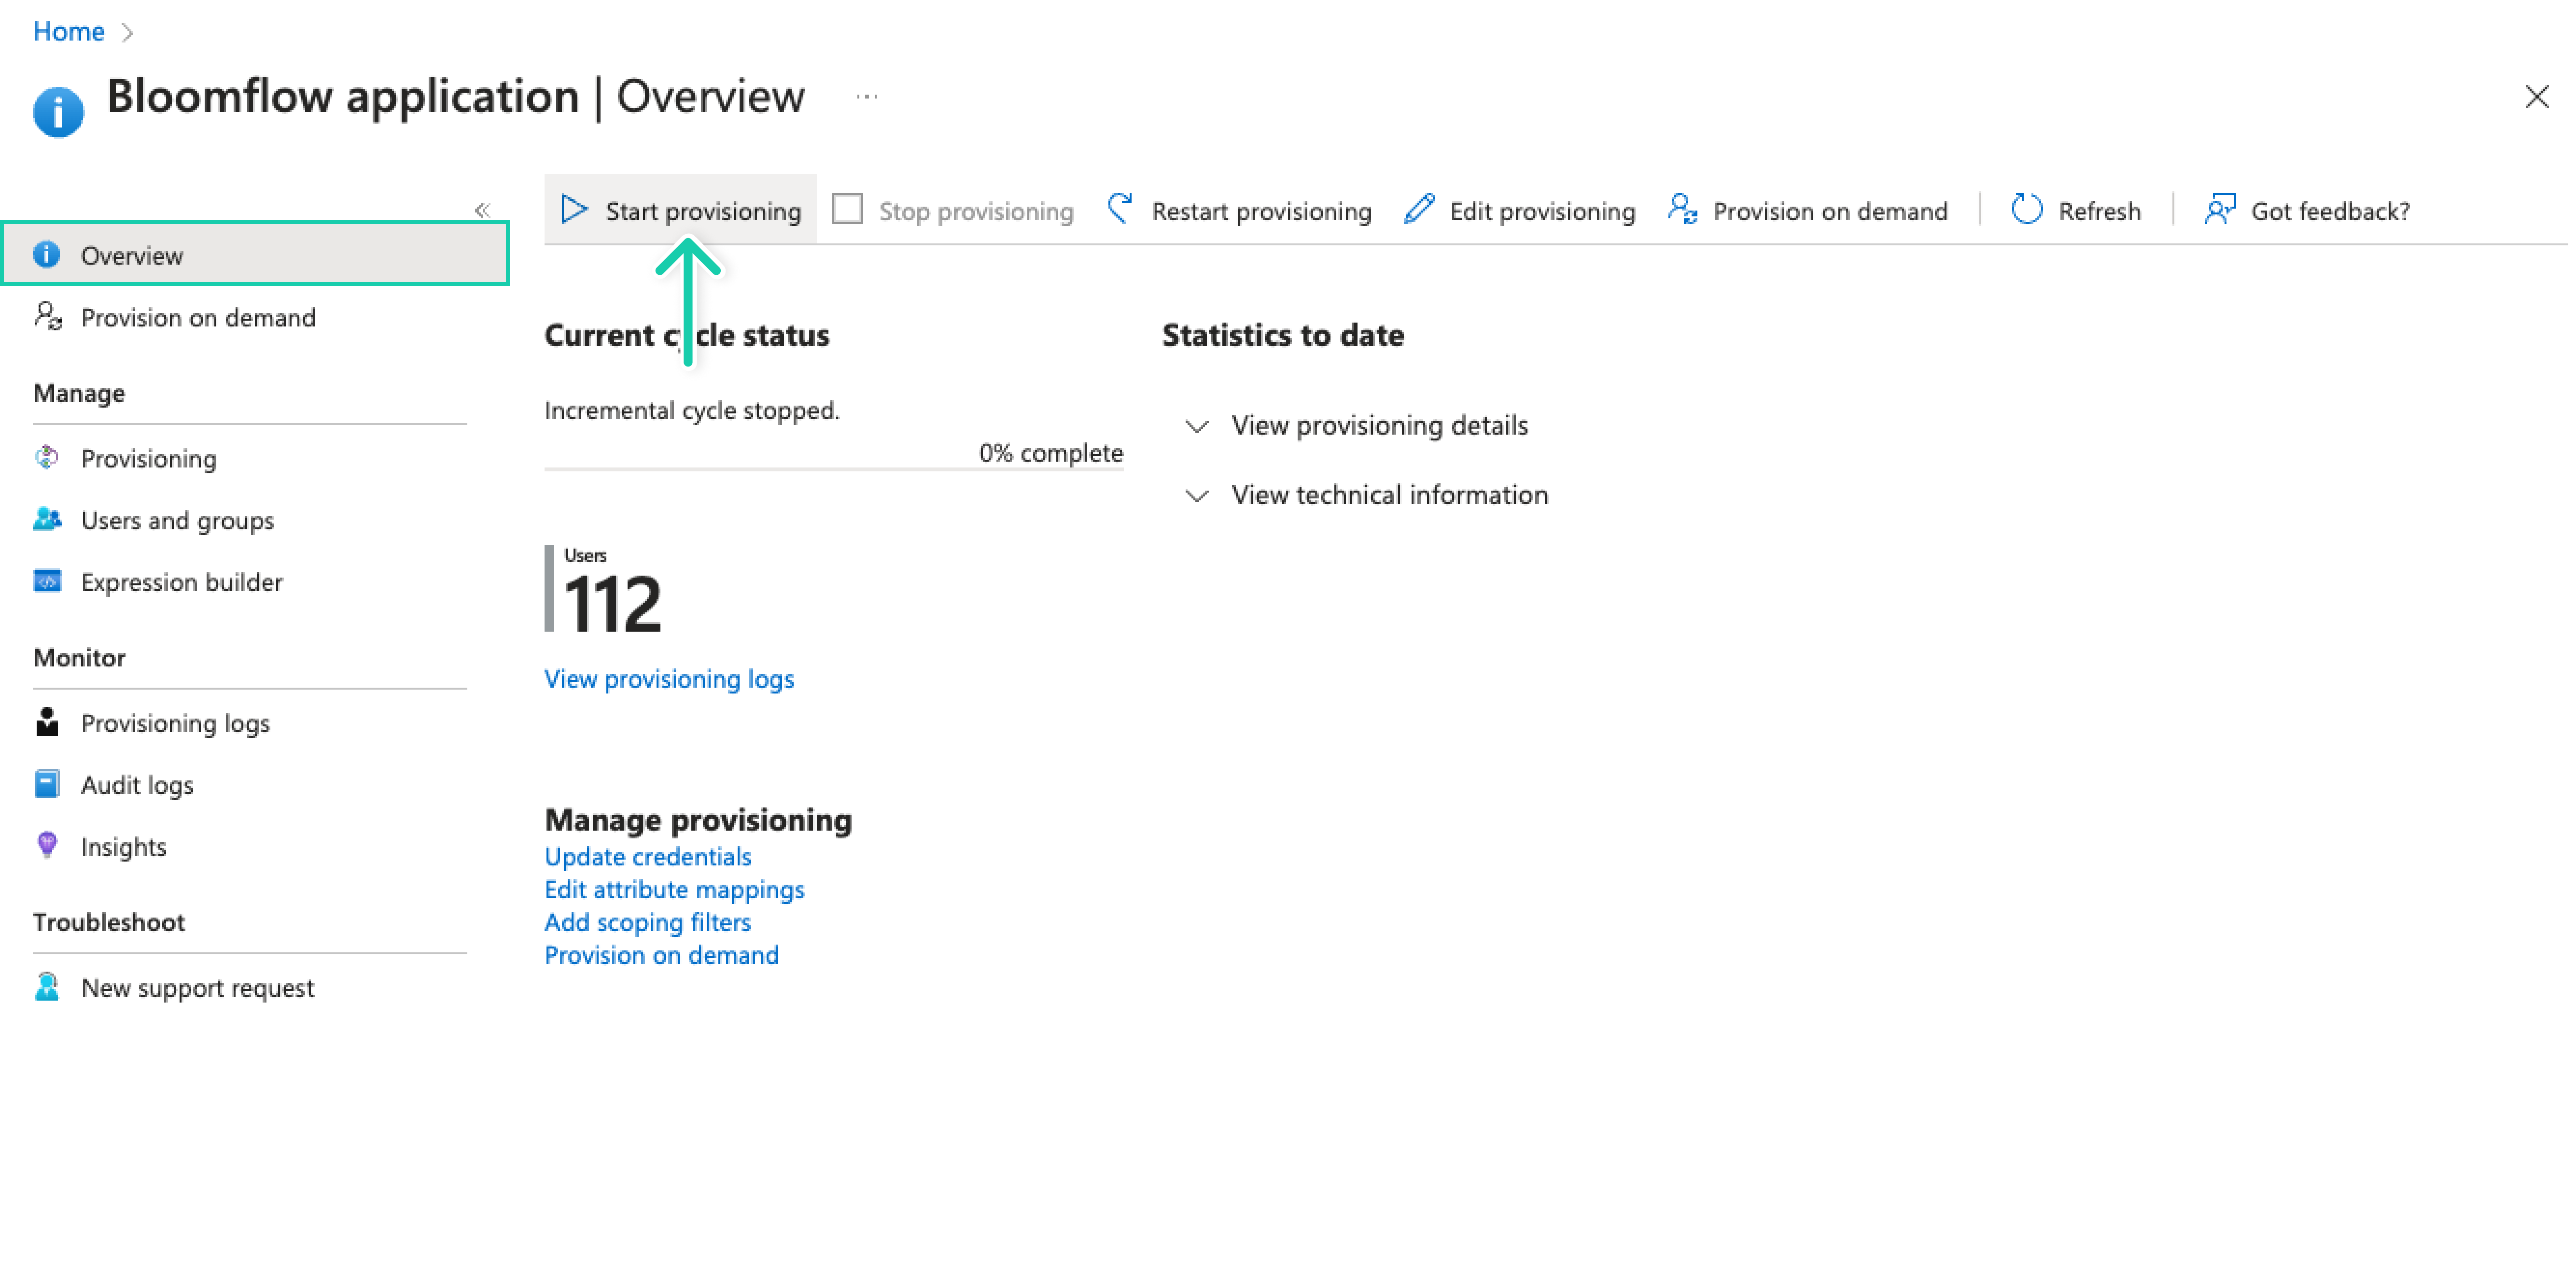
This operation starts the initial synchronization cycle of all users and groups defined in Scope in the Settings section. The initial cycle takes longer to execute than next cycles, which occur approximately every 40 minutes as long as the Microsoft Entra ID (Azure AD) provisioning service is running.
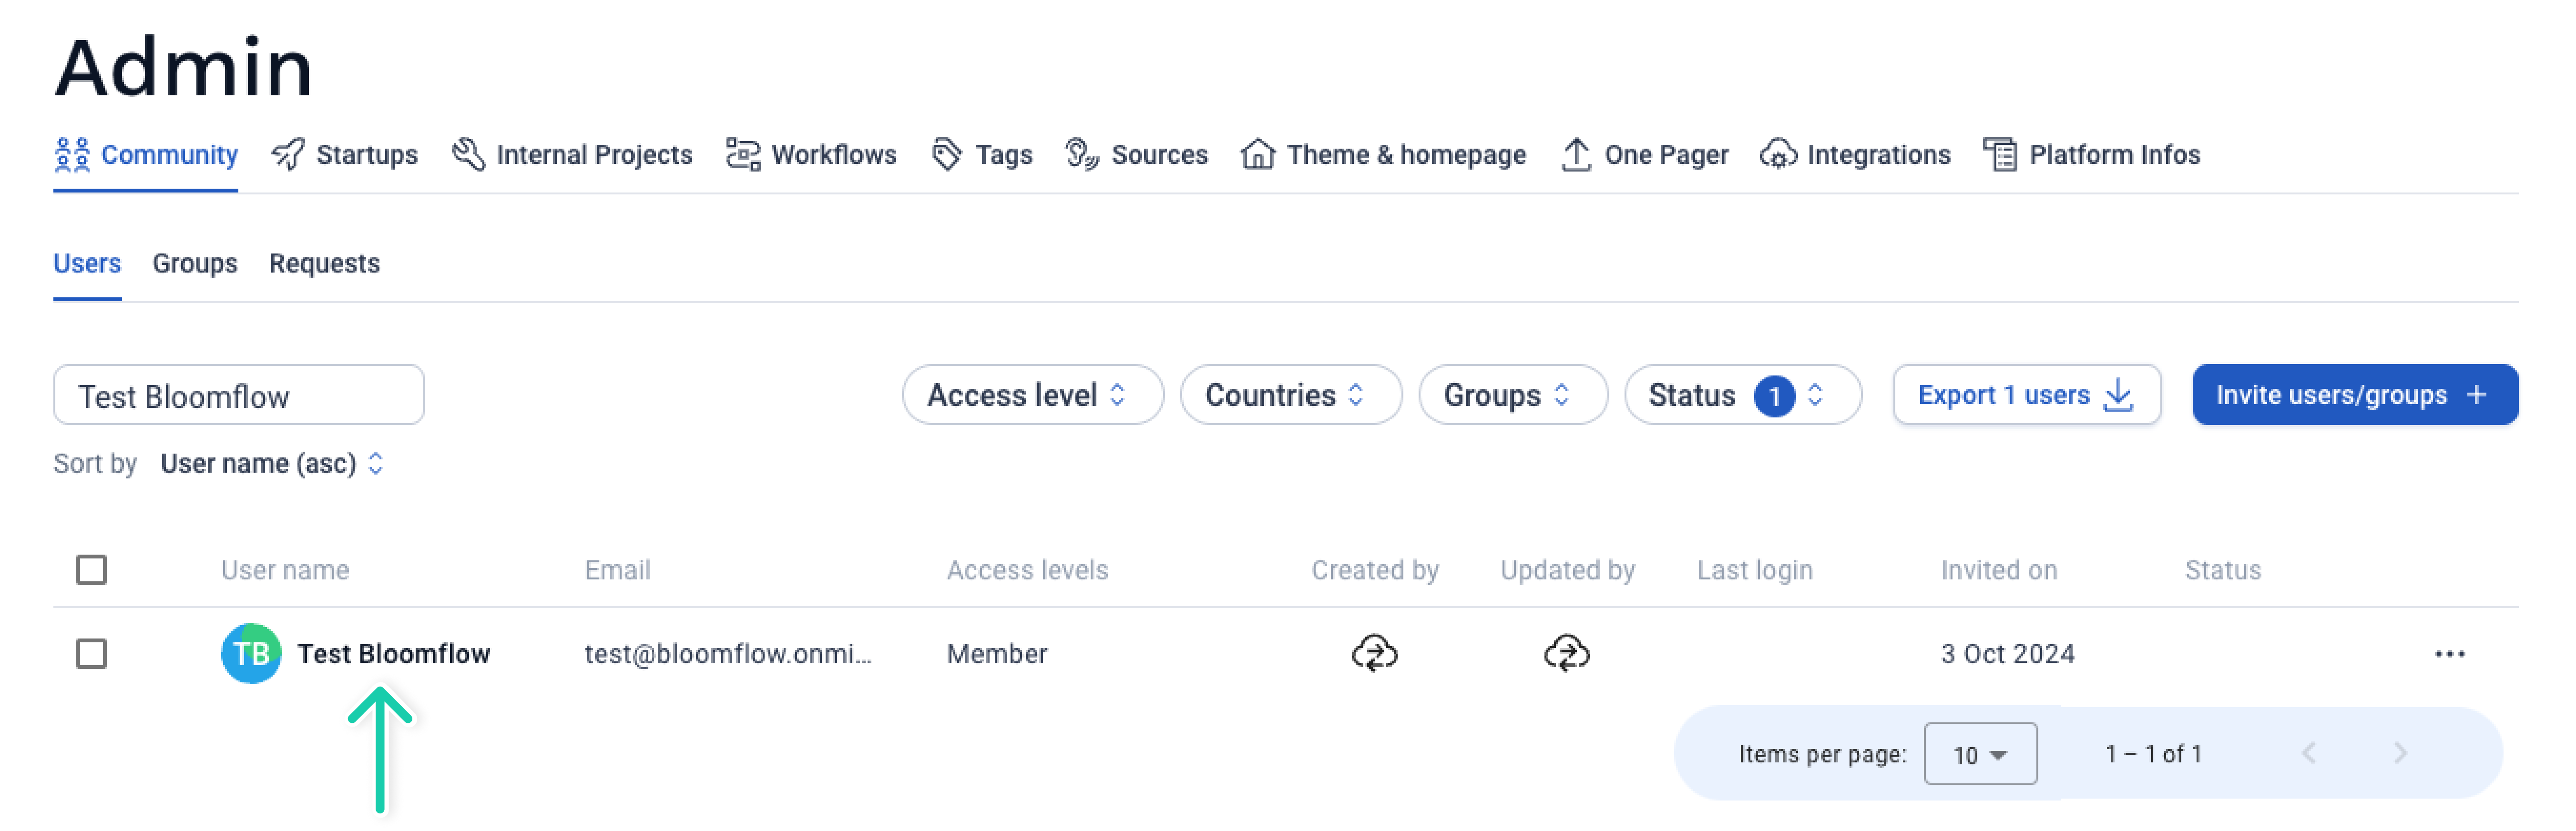
Step 5: Check Your Bloomflow Administration
Once the first user has been provisioned, you can go to the Admin panel of your Bloomflow platform, in the Users tab. If all has gone well you should see the provisioning icon appear for the user in the Created By and Updated By columns.
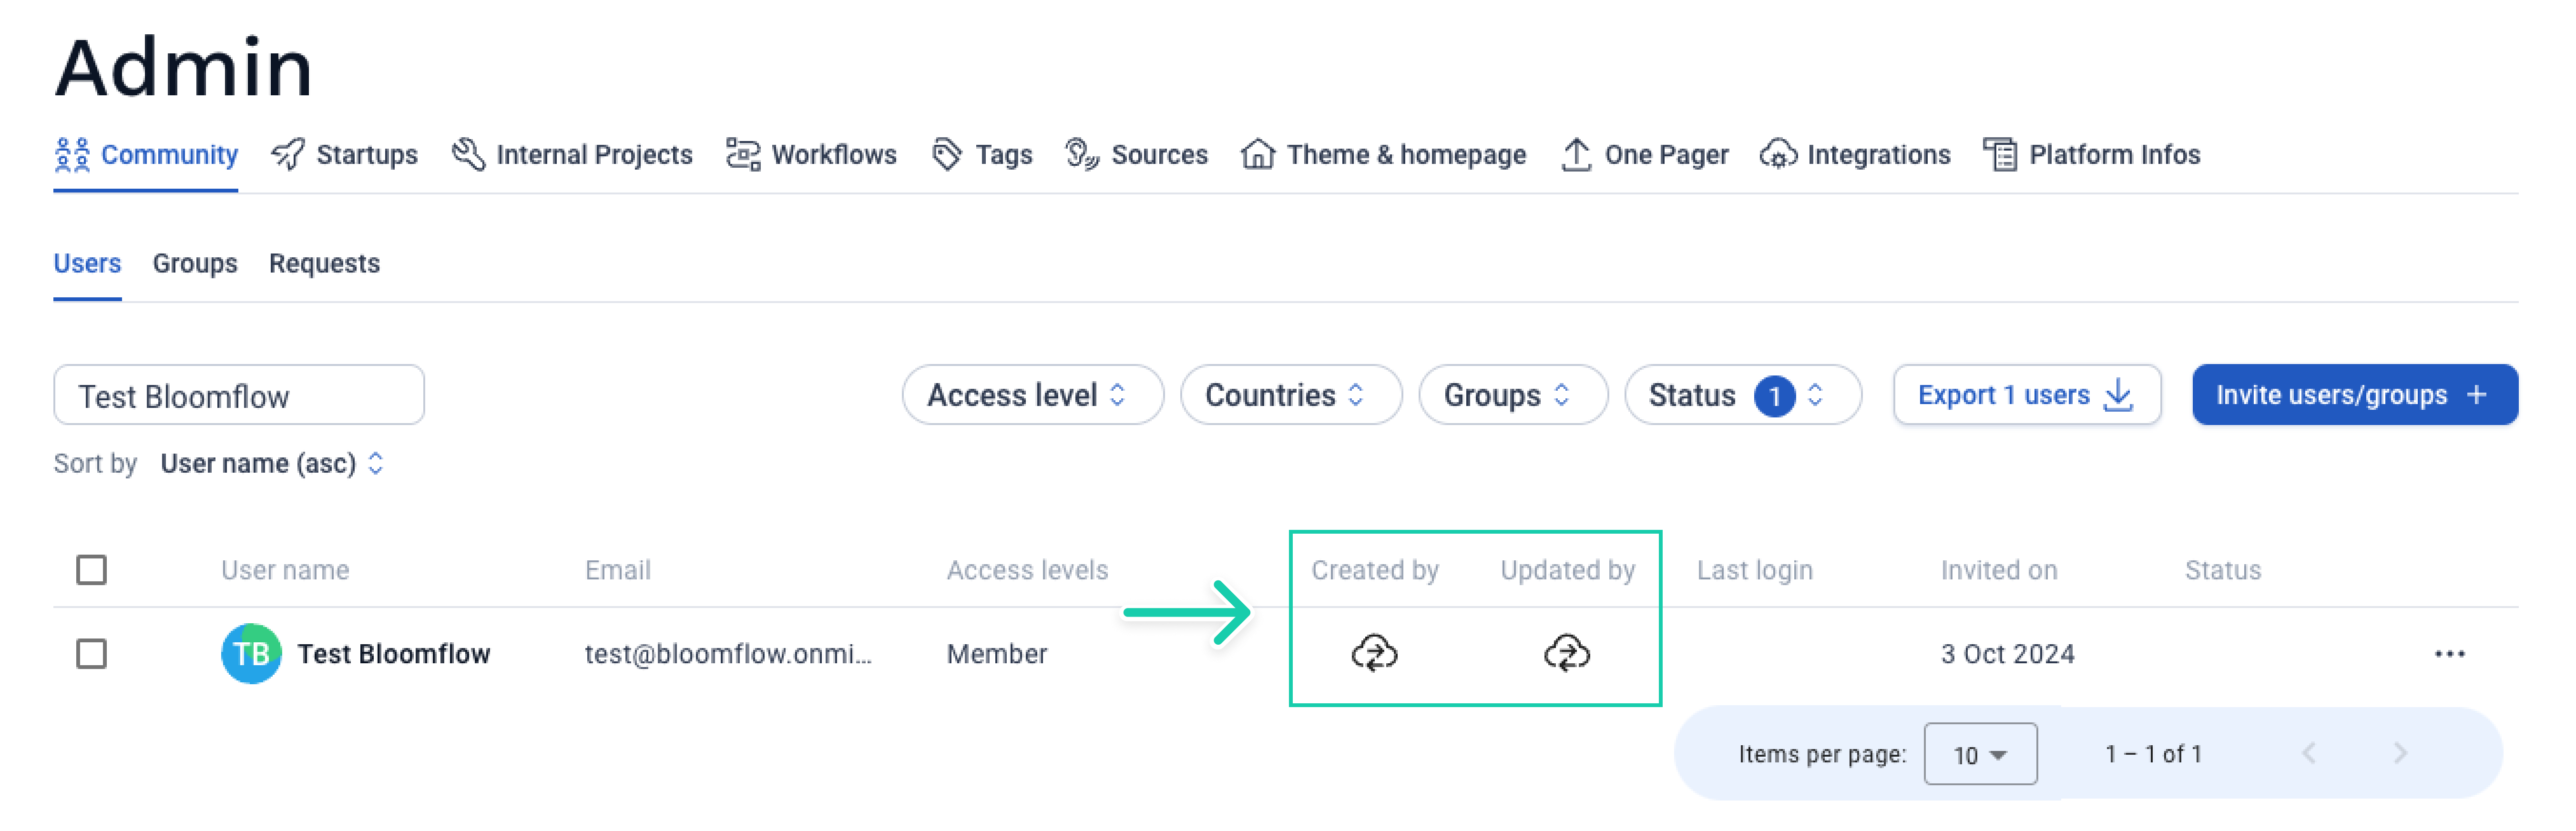
To check whether the user’s default fields have been updated, you can click on the user’s name and view their information from their profile view.